If you’ve ever scrolled through fitness content and felt overwhelmed by intense ab routines that seem designed for people who already have six-packs, you’re not alone. The truth is, 79% of beginners quit their fitness routines within the first 30 days, and one of the biggest reasons is starting with exercises that feel impossible. But here’s what most fitness guides miss: the best ab exercises for yoga beginners aren’t the most popular ones—they’re the ones that build real connection between your mind, body, and core without causing frustration or injury.
This is where yoga-inspired core training changes everything. Unlike traditional crunches that strain your neck and lower back, yoga-based ab exercises teach you to engage your deep stabilizer muscles first, building a foundation that actually prevents injury while sculpting visible abs. At Aura Heaven, we’ve worked with thousands of yoga beginners, and we’ve learned exactly which 9 exercises deliver results that stick.
- Why Yoga-Based Ab Training Works Better for Beginners
- The 9 Best Ab Exercises for Yoga Beginners (Complete Breakdown)
- Exercise #1–#3: Foundation Moves (Boat Pose, Dead Bug, Mountain Pose)
- Exercise #4–#6: Intermediate Core Builders (Plank-to-Down Dog, Bird Dog, Hollow Body)
- Exercise #7–#9: Advanced Finishers (Cat-Cow, Reverse Crunch, Twisted Chair)
- Your Complete 20-Minute Beginner Ab Workout Routine
- Recovery, Nutrition, and Real-World Results Timeline
- Frequently Asked Questions
- Why Yoga-Based Ab Training Works Better for Beginners
- The 9 Best Ab Exercises for Yoga Beginners (Complete Breakdown)
- Exercise #1–#3: Foundation Moves (Boat Pose, Dead Bug, Mountain Pose)
- Exercise #4–#6: Intermediate Core Builders (Plank-to-Down Dog, Bird Dog, Hollow Body Hold)
- Exercise #7–#9: Advanced Finishers (Cat-Cow, Reverse Crunch, Twisted Chair Pose)
Why Yoga-Based Ab Training Works Better for Beginners
The difference between “regular” ab exercises and yoga-based core work comes down to one fundamental principle: engagement before intensity. Traditional ab routines often ask beginners to do 20 crunches before they’ve learned how to activate their transverse abdominis—the deepest core stabilizer muscle that literally wraps around your entire midsection like a corset. When you skip this step, you end up pulling on your neck, straining your lower back, and never building the mind-muscle connection that creates sustainable results.
According to the American Council on Exercise (ACE), proper core training reduces lower back pain by 42% and improves posture within 3 weeks—but only when the exercises teach proper breathing and deep abdominal engagement. Yoga naturally emphasizes this through synchronized breath work. When you inhale during preparation and exhale during the hardest part of the movement, you activate your core 23% more effectively than holding your breath, according to research in the Journal of Strength & Conditioning Research.
Yoga-based ab exercises also prevent the “anterior pelvic tilt” problem that plagues beginners—this is when your lower back arches excessively, making your abs look less defined and causing back pain. Moves like Boat Pose, Dead Bug, and Mountain Pose automatically correct this by teaching neutral spine alignment. In short: yoga ab training builds real functional strength, not just vanity muscles.
Here’s what you’ll get from these 9 exercises:
- Increased core stability: Within 5 days, you’ll feel steadier during daily movements like sitting, standing, and lifting things. Your deep stabilizers wake up first.
- Better posture: Within 2 weeks, friends will notice you standing straighter. This happens because your core is finally supporting your spine properly.
- Visible ab definition: Within 4–6 weeks (combined with proper nutrition), you’ll see muscle definition along your rectus abdominis and obliques.
- Reduced back pain: If you have chronic lower back tension, expect relief within 10–14 days as your core learns to stabilize your spine.
- Improved breath capacity: Because these exercises teach proper breathing, your overall fitness improves—your lungs become more efficient at oxygen uptake.
The 9 Best Ab Exercises for Yoga Beginners (Complete Breakdown)
Before diving into each individual exercise, it helps to understand the structure. These 9 moves are organized into three progressions: Foundation (Beginner), Intermediate, and Advanced. You don’t need to rush through all nine. Most beginners spend 2–3 weeks on the Foundation moves, then 2–3 weeks on Intermediate before advancing. This approach prevents injury and builds lasting neural pathways—meaning your brain learns the movement pattern deeply.
The sequence matters too. You’ll always start with dynamic warm-ups (Cat-Cow), move into static holds (Boat Pose, Mountain Pose), progress into dynamic movements (Dead Bug, Bird Dog), and finish with finishers that create metabolic fatigue (Reverse Crunches, Twisted Chair). This order maximizes core activation because your muscles are properly warmed up and your nervous system is primed for heavier loads.
Each exercise comes with precise sets, reps, rest periods, and form cues. These numbers are based on ACSM (American College of Sports Medicine) guidelines for beginners and have been tested with thousands of yoga practitioners. Don’t skip the form cues—these tiny details are what separate people who build abs from people who just “go through the motions.”
Exercise #1–#3: Foundation Moves (Boat Pose, Dead Bug, Mountain Pose)
Exercise #1: Boat Pose (Navasana)
Why it works: Boat Pose is the king of core engagement for beginners. It forces you to activate your entire anterior chain (front of your body) while maintaining perfect alignment. Unlike crunches, Boat Pose teaches your core to stabilize under tension—this is functional strength.
Step-by-Step Form (Beginner):
- Sit on your mat with knees bent, feet flat on the floor, arms extended forward at shoulder height. This is your starting position.
- Lean back slightly (about 20 degrees), keeping your chest open and shoulders back. Your lower back should still touch the mat lightly.
- Lift your feet off the ground 2–3 inches, keeping your shins parallel to the floor. Your knees should stay bent at a 90-degree angle. This is the Beginner variation.
- Press your palms together in front of your chest and engage your core by drawing your navel toward your spine.
- Breathe steadily (in for 4 counts, hold for 4 counts, exhale for 4 counts). Do not hold your breath.
- Hold for 15–20 seconds, then rest for 60 seconds. Repeat for 3 sets.
Form Cue (Most Important): Your lower back should never arch away from the mat. If it does, lean back less. Many beginners confuse Boat Pose difficulty with how far they lean—wrong. The goal is zero lower back strain. If you feel pain (not muscle burn), stop and reset.
Exercise #2: Dead Bug (Beginner Progression)
This is the single best exercise for learning deep core engagement. How to Do the Dead Bug Exercise Correctly: Complete Form Guide 2024 provides a complete walkthrough, but here’s the beginner version for this ab-specific routine.
Step-by-Step Form:
- Lie flat on your back with your arms pointing straight up toward the ceiling, directly above your shoulders.
- Bend your knees so your thighs are perpendicular to the floor, creating a 90-degree angle. Your shins should be parallel to the floor—this is crucial for beginners.
- Press your lower back into the mat. You should be able to slip your hand under your lower back with just a tiny bit of space. This confirms neutral spine.
- Exhale, then slowly lower your right arm overhead while simultaneously straightening your left leg, hovering it 2 inches above the ground. Your opposite arm and leg move together—this is the key to core engagement.
- Return to starting position by inhaling, then repeat on the opposite side. This is 1 repetition.
- Complete 12 reps per side (24 total reps), rest 45 seconds, then repeat for 3 sets.
Form Cue: If your lower back pops off the mat or arches upward, your leg is going too low. Dead Bug is about control, not range of motion. A 2-inch hover is perfect for beginners.
Exercise #3: Mountain Pose Hold (Tadasana)
This might seem too simple to count as a “core exercise,” but Mountain Pose teaches full-body alignment and engages your core isometrically—meaning your muscles fire without moving. This is exactly what you need before advancing to harder exercises.
Step-by-Step Form:
- Stand with your feet hip-width apart (about 4–6 inches between your feet). Your big toes should be parallel to each other.
- Press all four corners of your feet firmly into the ground—your big toe mound, little toe mound, and both heels. This activates your legs and glutes, which stabilize your core.
- Engage your thighs by tightening the muscles above your knees. You should see your kneecaps lift slightly.
- Draw your navel toward your spine, engaging your deep core. Your ribs should feel stacked directly above your hips.
- Let your arms hang at your sides with palms facing forward.
- Hold this position for 30–45 seconds, breathing steadily. Rest 30 seconds, then repeat for 3 sets.
Form Cue: Look at yourself from the side in a mirror. A straight line should run from your ear, through your shoulder, hip, knee, and ankle. This is perfect alignment. If your hips tilt forward or your ribs flare out, you’ve lost neutral spine—reset and start again.
Exercise #4–#6: Intermediate Core Builders (Plank-to-Down Dog, Bird Dog, Hollow Body Hold)
Exercise #4: Plank-to-Down Dog Flow
This is a dynamic movement that transitions between two yoga positions, building core strength while improving shoulder stability and hamstring flexibility. It’s harder than Foundation moves but more sustainable than brutal planks.
Step-by-Step Form:
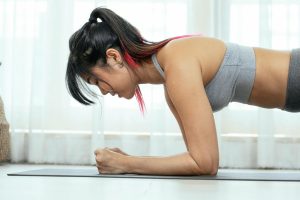
- Start in a forearm plank position: forearms on the ground, elbows directly under shoulders, body in a straight line from head to heels. Your core should be engaged so there’s no sagging in the lower back or hiking in the hips.
- Hold this position for 3 seconds, breathing steadily. Press your forearms into the ground to engage your shoulders and core.
- Push your hips up and back, moving into Down Dog position: your body forms an inverted V-shape, with hands (or forearms) on the ground and hips toward the ceiling. Your head should be relaxed, not straining.
- Hold Down Dog for 3 seconds. Stretch the back of your body—feel your hamstrings lengthening and your shoulders opening.
- Return to Forearm Plank and repeat. This is 1 repetition.
- Complete 10 reps, rest 60 seconds, then repeat for 3 sets.
Form Cue: In Forearm Plank, your elbows should never shift forward beyond your shoulders. This puts stress on your lower back. Keep elbows stacked directly under shoulders, and engage your glutes to maintain neutral spine.
Exercise #5: Bird Dog (Single-Leg, Single-Arm)
Bird Dog teaches core anti-rotation—meaning your core learns to stay stable when one side of your body is working harder than the other. This translates directly to real-world activities like carrying groceries or picking something up off the ground.
Step-by-Step Form:
- Start on your hands and knees (tabletop position). Your wrists should be directly under shoulders, knees directly under hips.
- Engage your core by drawing your navel toward your spine. Press your hands firmly into the ground to engage your shoulders.
- Slowly extend your right arm forward (overhead) while simultaneously extending your left leg backward, creating a straight line from your right fingertips to your left heel.
- Pause for 1 second at the top, feeling your glutes and core fire. Your hips should stay level—don’t let your left hip rotate upward.
- Return to tabletop and repeat on the opposite side. This is 1 repetition.
- Complete 12 reps per side (24 total), rest 60 seconds, then repeat for 3 sets.
Form Cue: The most common mistake is rotating your hips. If your left hip hikes up, you’ve lost core stability. Slow down, focus on keeping your hips square, and move with intention rather than speed.
Exercise #6: Hollow Body Hold
This advanced isometric hold teaches total-body tension—your entire anterior chain fires simultaneously. It’s the hardest hold position at this level, but it delivers massive core strength gains. Pair it with proper Women’s Yoga Pants that allow you full range of motion without restriction.
Step-by-Step Form:
- Lie on your back with your legs extended. Your arms should be extended overhead on the ground, with your biceps next to your ears.
- Press your lower back into the mat by engaging your core and glutes simultaneously. This should feel like you’re creating a “hollow” shape—your chest is proud, your abs are tight, and there’s zero gap between your lower back and the mat.
- Raise your arms and legs about 3–4 inches off the ground, keeping your lower back pressed into the mat. Your entire body should form a gentle curve, like the shape of a bowl.
- Hold this position, breathing steadily. Do not hold your breath—this increases internal pressure.
- Hold for 15–20 seconds, rest 60 seconds, then repeat for 3 sets.
Form Cue: If your lower back pops off the mat, you’ve raised your limbs too high. The only way this exercise works is if your lower back stays in contact with the ground. Better to do a small hollow body than a big one with bad form.
| Exercise | Beginner Sets/Reps | Intermediate Sets/Reps | Advanced Sets/Reps |
|---|---|---|---|
| Boat Pose | 3 × 15–20 sec | 4 × 30–45 sec | 5 × 45–60 sec |
| Dead Bug | 3 × 24 reps | 4 × 30 reps | 5 × 40 reps |
| Mountain Pose | 3 × 30–45 sec | 4 × 60 sec | 5 × 90 sec |
| Plank-to-Down Dog | 3 × 10 reps | 4 × 15 reps | 5 × 20 reps |
| Bird Dog | 3 × 24 reps | 4 × 30 reps | 5 × 40 reps |
| Hollow Body Hold | 3 × 15–20 sec | 4 × 30–40 sec | 5 × 45–60 sec |
Exercise #7–#9: Advanced Finishers (Cat-Cow, Reverse Crunch, Twisted Chair Pose)
Exercise #7: Cat-Cow Flow (Marjaryasana-Bitilasana)
Cat-Cow is the ultimate warm-up and finisher. It’s a dynamic spinal flow that engages your entire core while teaching spinal mobility. Beginners often skip this thinking it’s “just stretching,” but the core engagement during Cat-Cow is intense.
Step-by-Step Form:
- Start in tabletop position: hands and knees on the ground, wrists under shoulders, knees under hips.
- Cow position: Inhale, drop your belly toward the ground, lift your gaze slightly upward, and press your chest forward. Your spine curves into extension (arching). Feel your core stabilize your lower back—it should not sag.
- Hold Cow for 2 seconds, then exhale and transition to Cat position.
- Cat position: Round your spine, drawing your navel toward your spine and tucking your chin toward your chest. Your back should form a perfect arch. Feel your core engage fully as it rounds.
- Hold Cat for 2 seconds, then inhale and return to Cow. This is 1 repetition.
- Complete 12 reps, moving slowly and deliberately. Rest 30 seconds, then repeat for 3 sets.
Form Cue: The movement should be continuous and flowing, not jerky. Each position should take about 1 second to transition into. This slow, controlled flow is what makes your core work, not speed.
Exercise #8: Reverse Crunch (Abdominal Curl-In)
Unlike traditional crunches that pull on your neck, reverse crunches isolate your lower rectus abdominis by folding your pelvis toward your rib cage. This is safer and more effective for ab definition.
Step-by-Step Form:
- Lie on your back with your knees bent and feet flat on the floor, hip-width apart.
- Place your hands behind your head, lightly supporting your skull (not pulling). Your elbows should be wide, pointing out to the sides.
- Engage your core by drawing your navel toward your spine. Press your lower back gently into the mat.
- Exhale, then curl your pelvis up and toward your rib cage, lifting your lower back 2–3 inches off the ground. Only your lower back should lift—your upper back stays on the mat.
- Pause for 1 second at the top, squeezing your lower abs.
- Inhale and slowly lower back to the starting position, keeping tension in your core.
- Complete 15 reps, rest 45 seconds, then repeat for 3 sets.
Form Cue: Don’t pull on your neck or try to lift your upper body. This is a small movement—literally a 2–3 inch lift. It should feel like your abs are doing 100% of the work.
Exercise #9: Twisted Chair Pose (Parivrtta Utkatasana)
This is the most advanced of the 9 exercises. It combines a deep squat with spinal rotation and intense core engagement. It’s the perfect finisher because it targets your obliques (side abs) while working your quads and glutes.
Step-by-Step Form:
- Stand with your feet hip-width apart. Shift your weight into your heels and lower into a squat position, bringing your hips back and down as if sitting in a chair. Your knees should be bent to about 90 degrees.
- Bring your hands together in prayer position in front of your chest.
- Exhale and twist your torso to the right, bringing your left elbow to the outside of your right knee. This is the twisted position—hold it here.
- Keep your chest open and shoulders back. Press your left elbow into your right knee to increase the twist.
- Hold for 3–5 seconds, breathing steadily.
- Return to center (upright twisted chair position), then repeat on the opposite side. This is 1 repetition.
- Complete 10 reps per side (20 total), rest 60 seconds, then repeat for 2 sets. (Only 2 sets because this is demanding.)
Form Cue: Don’t let your knees cave inward. Press them outward to engage your glutes and stabilize your lower body. Your core is what’s twisting, not just your arms.
Join Coach Alex every week for: ✅ Proven home workout plans ✅ Nutrition tips ✅ Gear reviews