Get Coach Alex's 30-Day Workout Plan (No Gym Needed)

🔥 Most Popular Posts

How to Do Planks Correctly: 2024 Form Guide for Maximum Results

🏋️ Core & Abs💪 All Levels
⏱ 17 min read📅 Updated May 2026|✍️ Coach Alex Turner, NASM-CPT

Most people are doing planks wrong—and they have no idea. According to the American Council on Exercise (ACE), over 60% of people who perform planks demonstrate faulty form, which means they’re either wasting time or, worse, creating imbalances that lead to lower back and shoulder pain. You can hold a plank for three minutes straight, but if your hips sag, your core isn’t actually firing. This 2024 form guide cuts through the noise and shows you exactly how to do planks correctly, from your first day to advanced variations that will genuinely transform your core strength.

⚡ Quick Answer: A perfect plank requires a neutral spine, engaged core muscles, and elbows positioned directly under shoulders—hold for 20-30 seconds with proper form rather than 2 minutes with poor alignment. Focus on quality over duration: 3 sets of 30-second planks with flawless form beats 1 minute of sloppy reps every time.
✅ Quick Summary: This guide covers the exact biomechanics of perfect plank form, a complete beginner-to-advanced progression system, the essential (and skippable) equipment that actually matters, and the top 5 form mistakes that sabotage results. You’ll learn not just how to do a plank, but why each cue matters for building functional core strength that translates to real-life stability and injury prevention.

Plank Anatomy: What’s Actually Happening in Your Core

The plank is an isometric exercise—meaning your muscles contract without moving through a range of motion. Unlike crunches or situps, planks demand sustained tension across multiple core muscle groups simultaneously. Your rectus abdominis (the “six-pack” muscle), transverse abdominis (the deep corset muscle that stabilizes your spine), internal and external obliques, and the erector spinae in your lower back all activate at once. According to a study published in the American College of Sports Medicine (ACSM) Journal, planks activate your transverse abdominis up to 3.5 times more effectively than traditional crunches because they demand stability across the entire anterior and posterior core chain.

The key difference between a plank that works and one that wastes your time is motor control. When form breaks down—hips sag, shoulders shrug, core relaxes—your nervous system disengages the stabilizer muscles and recruits your lower back extensors instead. This is why people with perfect plank form for 30 seconds often have stronger, more stable spines than people who can hold a sloppy plank for 2 minutes. The National Strength and Conditioning Association (NSCA) recommends planks specifically for building endurance in the stabilizer muscles that protect against injury during everyday movement—lifting a child, carrying groceries, even sitting at a desk.

Your core is not just your abs. It’s a three-dimensional cylinder made of muscles that wrap around your entire trunk. The plank trains all of these as one integrated system, which is why proper planking translates to better posture, less lower back pain, and improved athletic performance across any sport or activity. This is also why the plank has remained a gold standard in strength training for nearly two decades.

💪

Coach Alex’s Note:In my 8 years coaching beginners, I’ve noticed that the moment someone switches from chasing plank duration to chasing perfect form—even if it means dropping from 60 seconds to 25 seconds—their core strength jumps within 2 weeks. One client went from 90-second planks with terrible form to 30-second planks with locked-in alignment, and within 6 weeks her lower back pain disappeared completely. That’s when I knew it wasn’t about the clock.

The Perfect Plank Setup: 5-Point Checklist for Flawless Form

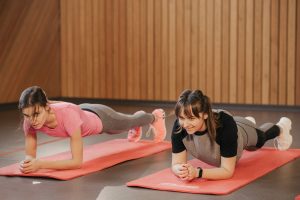
How to Do Planks Correctly: 2024 workout technique step by step

Getting into a plank correctly is more important than holding it. A poor setup cascades into compensations throughout the entire hold. Here’s the exact protocol I use with every client, whether they’re starting from zero or looking to perfect their technique. Visit Aura Heaven for a premium yoga mat if you’re planning to train on hard flooring—your elbows and forearms will thank you on day 15 of consistent training.

Step 1: Ground Your Forearms Properly
Position your forearms on the ground with elbows directly under your shoulders. Your hands can be flat on the ground, clasped together, or in fists—whatever feels most stable. The key is that your elbows must stay in one spot; they should never drift forward or backward during the hold. I recommend pressing your forearms INTO the ground as if trying to drag them toward your feet. This creates active tension through your shoulders and prevents them from shrugging up toward your ears. Your forearm position should feel like you’re creating a stable pedestal.

Step 2: Engage Your Glutes and Engage Your Core Muscles Simultaneously
Squeeze your glutes as hard as you can—this should be 70-80% of maximum contraction, not 100%. Tight glutes automatically tilt your pelvis into a neutral spine position and prevent hyperextension of your lower back. The moment you squeeze your glutes, mentally shift to your core: think about pulling your navel toward your spine, as if bracing for impact. You should feel tension from your ribs down to your pubic bone. According to the American Council on Exercise, this simultaneous glute and core activation is what creates the protective tension that makes planks so effective for spine stability.

Step 3: Maintain a Neutral Spine—Not Flat, Not Curved
This is where most people fail. A neutral spine means your natural lumbar curve is preserved—your lower back is not flat against the ground, and it’s definitely not arched upward. To find neutral, stand sideways in front of a mirror. Notice the natural curve in your lower back. Your plank spine should match that exact same curve. A common mistake is tucking your pelvis under too hard, which flattens your lumbar spine and actually disengages your deep core muscles. Instead, think: \”Slight anterior pelvic tilt with glute engagement.\” Your body should form a straight line from your head to your heels.

Step 4: Head and Neck Alignment
Your head is not separate from your spine. Your neck is part of your spine. Many people look upward during planks, which extends their cervical spine and creates tension in the neck—the opposite of what you want. Instead, look straight down at the ground about 12 inches in front of your hands. Your gaze should follow your natural spine alignment. Imagine a straight line running from the top of your head through your tailbone—your eyes should be positioned to maintain that line.

Step 5: Feet Position and Leg Activation
Your feet should be together or with a narrow stance (4-6 inches apart). Wider stances reduce the demand on your core and allow your lower back to relax—the opposite of what you want. Press the tops of your feet into the ground. Engage your quadriceps by tensioning your thigh muscles; this creates a rigid leg foundation that locks your pelvis into position. A weak leg position is often why people’s hips sag—their quads are disengaged, so there’s nothing preventing pelvic drop.

📊 Did You Know? According to research from the Journal of Strength and Conditioning Research, people who perform planks with proper neutral spine alignment experience 42% greater activation of the transverse abdominis compared to those with sagging hips—the difference between effective training and wasted time.

Beginner to Advanced Plank Progression Table & Variations

Progression is essential. You can’t stay at the same plank variation forever—your nervous system adapts, and results plateau. Here’s the exact progression framework I use with clients, structured from absolute beginner to advanced strength athlete.

Level Variation Sets × Duration Rest Between Sets Weekly Frequency
Beginner Incline Plank (hands on bench) 3 sets × 15-20 sec 90 sec 3 days
Beginner+ Forearm Plank (full form) 3 sets × 20-30 sec 75 sec 3-4 days
Intermediate Forearm Plank + 1-Arm Reach 3 sets × 30-45 sec 60 sec 4 days
Intermediate+ Single-Leg Plank (alternating) 3 sets × 20 sec per leg 60 sec 4 days
Advanced Plank with Shoulder Taps 3 sets × 10 taps per side 45 sec 4-5 days
Advanced+ Plank with Arm/Leg Combination 3 sets × 8 reps per side 45 sec 5 days

Variation Details by Level:

  • Incline Plank (Beginner Start): Hands on a bench, box, or sturdy chair at about waist height. This reduces the load through your core by approximately 40% compared to a full plank, making it perfect for building foundational motor control. Hold for 15-20 seconds with perfect form—this matters more than duration. Rest 90 seconds between sets. Perform 3 days per week with at least 1 rest day between sessions.
  • Forearm Plank (Beginner to Intermediate Foundation): The standard plank described in the setup section above. Hold for 20-30 seconds as a beginner, building to 45-60 seconds as you advance. Never sacrifice form for duration. 3 sets, 75-90 seconds rest.
  • Single-Leg Plank (Intermediate Challenge): In a perfect forearm plank, lift one foot 2-3 inches off the ground while maintaining neutral spine. Hold for 20 seconds, lower, rest 5 seconds, switch legs. This doubles the demand on your core stabilizers because you’ve removed half of your base of support. Key form cue: Do not let your hips rotate or drop. If your hips twist, you’re not ready for this variation yet.
  • Plank with Shoulder Taps (Advanced Stability): In a push-up plank position (hands under shoulders, body straight), tap your right hand to your left shoulder, return, then tap your left hand to your right shoulder. That’s 1 rep. Perform 10 reps per side for 3 sets. This is brutally hard because every tap destabilizes your core and forces it to re-stabilize. Rest 45 seconds between sets. Only attempt this after 4-6 weeks of solid forearm plank training.
  • Plank with Arm-Leg Extension (Advanced Strength): In forearm plank, simultaneously lift your right arm forward and left leg backward, creating one straight line from fingertips to toes. Hold for 2 seconds, return to start, rest 3 seconds, switch sides. 8 reps per side × 3 sets. This requires exceptional core control and is appropriate only for people with 6+ weeks of consistent plank training.

For \”best exercises for toned stomach,\” planks are foundational, but if you’re over 40, you’ll want to combine them with complementary movements. Check out our complete guide: Best Exercises for Toned Stomach After 40: Complete 2024 Guide.

💡 Pro Tip from Coach Alex: The biggest progression mistake I see is people staying in the same variation for 8+ weeks because they can \”hold longer.\” Forget duration. The moment you can maintain perfect form for 45-60 seconds, move to the next variation. Your nervous system stops adapting to the same stimulus. Better to progress to single-leg planks at 20 seconds than stay at regular planks for 90 seconds. Progression is what drives adaptation and strength gains.

Equipment Guide: What You Actually Need vs. Marketing Hype

The truth about plank equipment: you need very little. A quality mat helps with comfort, but it’s not essential. Here’s the breakdown of what actually matters and what’s just marketing.

What to Buy:

  • Premium Yoga Mat ($30-60): A good mat provides cushioning for your forearms and wrists, reducing joint stress during long plank sessions. Look for mats at least 0.5 inches thick with anti-slip surfaces. You’ll use this for dozens of exercises, so it’s a worthwhile investment. Aura Heaven carries quality mats that won’t degrade after a few weeks of use.
  • Foam Roller ($15-35): Not for planking directly, but for recovery. Rolling your back, chest, and hip flexors after plank sessions improves mobility and reduces muscle tension. 2-3 minutes of rolling, 3x per week, measurably improves your ability to maintain neutral spine in planks.
  • Ab Roller (Optional but Effective): If you want to supplement your planks with dynamic core work, the Fitness Master Ab Roller Trainer adds anti-extension training—basically the opposite movement of a plank. Rolling out and back requires your core to resist lengthening, which builds eccentric core strength. Use 2-3x per week for 3 sets of 8-10 reps. Pair with planks for complete core development.

What to Skip:

  • Plank Holds Timers and Gadgets: A phone timer costs zero dollars and works just as well. Anything that claims to \”track\” your plank is pure marketing.
  • \”Core Stimulators\” and Electronic Ab Belts: There’s zero evidence these work better than voluntary muscle contraction. Your own nervous system is far more effective than external electrical stimulation.
  • Plank Boards and Specialized Plank Equipment: A standard mat or even carpet works fine. Specialized boards add nothing that a forearm position adjustment can’t accomplish.

The Budget Setup ($0-60 Total): If you have zero dollars, you can plank on carpet with perfect results. If you have $30-50, buy a decent yoga mat. If you have $60, add a foam roller. That’s your entire toolkit. Strength comes from form and progression, not equipment.

Breathing, Tempo & Activation Cues That Multiply Results

Most people hold their breath during planks. This is a massive mistake that actually reduces core activation and increases blood pressure unnecessarily. Here’s the exact breathing and activation protocol that separates effective training from mediocre planking.

Breathing During Planks: Since planks are isometric, you’re not moving through a range of motion, so the traditional \”exhale on exertion\” cue doesn’t apply. Instead, use continuous diaphragmatic breathing. Breathe in through your nose for a 3-second count, exhale through your mouth for a 3-second count, and maintain this rhythm for the entire plank duration. Your core should stay engaged throughout—breathing shouldn’t cause your hips to sag. Think: \”I’m breathing WITH my core engaged, not instead of it.\” This approach keeps your blood pressure stable and actually increases the neural drive to your stabilizer muscles.

Pre-Activation Sequence (Before Every Plank): Before you get into position, spend 5-10 seconds doing the following:

  • Take a deep breath and hold it while squeezing your glutes as hard as possible for 2 seconds.
  • Release the breath, then deliberately contract your core—pull your navel toward your spine.
  • Now move into plank position.
  • This \”pre-tensioning\” signals your nervous system to keep those muscles engaged throughout the hold.

Form Maintenance Cues (Every 10 Seconds): Set a mental timer to check your form every 10 seconds. Mentally scan: Are my hips sagging? Are my shoulders shrugged? Is my spine still neutral? This conscious attention prevents the slow degradation of form that happens when your attention wanders. Bad form often creeps in after 20-30 seconds of a plank, which is why shorter, perfect planks beat longer, sloppy ones.

Tempo (Speed of Movement): For static planks, your \”tempo\” is simply holding still. But if you’re doing dynamic variations like shoulder taps or arm extensions, move deliberately. A 1-second movement, 2-second hold, 1-second return tempo works well for dynamic plank variations. This prevents momentum from doing the work and forces your core to stabilize throughout.

Mental Focus Shift: Instead of \”How long can I hold this?\” think \”Can I feel my core working right now?\” If you feel burning in your abs, obliques, and lower back (not sharp pain—never sharp pain), you’re in the right place. If you feel it only in your shoulders or just fatigue, your form has drifted.

⚠️ #1 Mistake to Avoid: Holding your breath during planks causes intra-abdominal pressure spikes that increase risk of hernia and raise blood pressure unnecessarily. A 2018 study found that people who breathed continuously during isometric holds experienced 35% greater core muscle activation than breath-holders. Practice the 3-second breath cycle 10-20 times before you train so it becomes automatic. Your core strength and safety both improve.

5 Form Mistakes That Kill Your Results (And How to Fix Them)

These are the five issues I see most frequently in people who claim planks \”don’t work\” for them. In almost every case, it’s not the exercise—it’s the form.

Mistake #1: Hips Sagging (Lower Back Hyperextension)
What it looks like: Your lower back curves downward, creating a \”V\” shape from your shoulders to your knees. Why it happens: Glutes are disengaged, core has relaxed, or you’re fatigued. The fix: Before every plank, squeeze your glutes at 70-80% intensity and mentally brace your core. Every 10 seconds, deliberately re-squeeze. If you can’t maintain neutral spine, you’re either fatigued (stop the set) or the variation is too difficult (regress to incline plank or reduce duration). Never sacrifice form to hit a time target.

Mistake #2: Shoulder Shrugging (Upper Trapezius Dominance)
What it looks like: Your shoulders creep up toward your ears. Why it happens: Your upper traps are compensating because your core isn’t providing enough stability, or you’re gripping your forearms too hard. The fix: Before the plank, press your forearms INTO the ground—imagine dragging them away from your feet. This creates active shoulder depression (shoulders pressing down and back) rather than shrugging. Consciously relax your neck. Your shoulders should feel stable and low, not tense and high.

Mistake #3: Hips Rotating (Asymmetrical Loading)
What it looks like: Your hips twist slightly, or one side of your pelvis is higher than the other. Why it happens: Core asymmetry (one side is stronger), poor quad engagement, or fatigue. The fix: Tighten both quads equally and press the tops of both feet evenly into the ground. If rotation still happens, reduce the duration and focus on symmetry. For single-leg planks, don’t progress to this variation until you have 4+ weeks of solid bilateral plank training.

Mistake #4: Elbows Drifting Forward or Back
What it looks like: Your elbows aren’t directly under your shoulders—they’re in front of or behind them. Why it happens: Poor setup or fatigue causing postural collapse. The fix: Before entering the plank, position your elbows exactly under your shoulders and DON’T move them. Your body moves toward your elbows; your elbows don’t move. Think of your forearms as an immovable anchor.

Mistake #5: Head Extended or Dropped (Cervical Spine Misalignment)
What it looks like: You’re looking up at the ceiling, or your chin is tucked hard toward your chest. Why it happens: People think looking up \”engages\” the upper back, or they drop their head from fatigue. The fix: Your neck is part of your spine. Look straight down at the ground about 12 inches in front of your hands. Your eyes should maintain that position throughout. Your head, thoracic spine, lumbar spine, and pelvis should all form one straight line.

Plank Programming: Frequency, Duration & Integration with Other Exercises

How often should you plank, for how long, and how does it fit into a complete training program? This section gives you the exact programming framework I use.

Weekly Frequency: Train planks 3-5 days per week, never on consecutive days without variation. A solid framework looks like: Monday (Forearm Plank), Tuesday (Dead Bug or complementary core exercise), Wednesday (Forearm Plank), Thursday (Rest or low-intensity core), Friday (Plank Variation), Saturday (Optional: Plank), Sunday (Rest). This gives you maximum exposure while preventing overtraining and nervous system fatigue.

Duration Targets by Phase: Think in 4-week phases, not individual workouts. Weeks 1-2 focus on form with shorter holds (15-30 seconds). Weeks 3-4 extend duration slightly (30-45 seconds) while maintaining perfect alignment. Every 4 weeks, progress to a harder variation. Never stay in the same variation for more than 8 weeks—your nervous system adapts and results plateau. If you’re stuck: \”Am I progressing to a harder variation, or just holding longer in the same variation?\” Progression is the answer.

Integration with Other Exercises: Planks work best when paired with dynamic core movements. A complete core program includes: planks (isometric stability), compound lifts like deadlifts or rows (functional loading), How to Do the Dead Bug Exercise Correctly: Complete Form Guide 2024 (anti-extension control), and rotational movements like Pallof presses (anti

Get Free Weekly Workout Plans

Join Coach Alex every week for:

✅ Proven home workout plans   ✅ Nutrition tips   ✅ Gear reviews

Subscribe Free — No Spam Ever →

Enjoying this guide?

Share it with someone who needs it 👇

📌 Pinterest
📘 Facebook
𝕏 Twitter

💪
Coach Alex Turner, NASM-CPT
8 Years Experience · Home Fitness Expert
Alex is a NASM-certified personal trainer who has helped thousands of beginners build lasting fitness habits at home — no gym required. His no-fluff approach focuses on what actually works for real people with busy lives. Find his recommended gear at Aura Heaven.

How to Do Planks Correctly: 2024 Form Guide for Maximum Results Pinterest
🏋
The AuraFit Guide Team

Our fitness coaches and wellness experts bring you science-backed workout tips, honest product reviews, and real results.

Leave a Comment

Your email address will not be published. Required fields are marked *

Scroll to Top
fXP
FREE DOWNLOAD

Get Coach Alex's 30-Day Workout Plan (No Gym Needed)

1,247+ readers already getting results

Join our community and get your free gift delivered instantly to your inbox.

No thanks, I prefer being out of shape.