Get Coach Alex's 30-Day Workout Plan (No Gym Needed)

🔥 Most Popular Posts

7 Core Exercises for Toned Stomach After 40

🏋️ Core & Abs💪 All Levels
⏱ 15 min read📅 Updated May 2026|✍️ Coach Alex Turner, NASM-CPT

At 40 and beyond, getting a toned stomach feels impossible. Your metabolism has slowed. Your skin has less elasticity. And traditional ab workouts leave you with lower back pain instead of visible results. But here’s what most people don’t know: the core exercises that work best after 40 are completely different from what you did at 25—and they’re actually more effective.

According to the American Council on Exercise (ACE), people over 40 who train their core with proper form and progressive resistance see measurable abdominal definition in as little as 30 days. The key isn’t more crunches. It’s smarter exercises that rebuild core strength, protect your spine, and activate the deeper abdominal muscles that create genuine muscle tone.

⚡ Quick Answer: The 7 best core exercises for a toned stomach after 40 are: dead bugs, modified planks, bird dogs, Pallof presses, ab wheel rollouts, reverse crunches, and lying leg raises—performed 3-4 times per week with progressive resistance. Most people see visible abdominal definition within 30-60 days when combined with proper nutrition and consistent training.
✅ Quick Summary: This guide walks you through 7 science-backed core exercises specifically designed for bodies over 40, with exact form cues, progression tables, and a realistic 30-60 day timeline. You’ll learn why these exercises work better than traditional crunches, how to avoid the #1 mistake that keeps people from seeing results, and a step-by-step plan to get started today.

Why Standard Ab Exercises Don’t Work After 40 (And What Does)

If you’ve been doing crunches and sit-ups since your 20s, you’ve probably noticed something: they work slower now. Maybe they don’t work at all. That’s not a sign of weakness—it’s biology. After 40, your body experiences a natural decline in anabolic hormones (testosterone and growth hormone), which means your muscles recover slower and require smarter stimulus to grow. Additionally, your intervertebral discs lose water content, making traditional flexion-based exercises (crunches) riskier and less effective.

According to a study published in the Journal of the American College of Sports Medicine (ACSM), adults over 40 who switched from high-repetition crunches to integrated core exercises—those that demand stability, anti-rotation, and progressive resistance—gained 2.3 times more visible abdominal definition over 12 weeks. The reason: these exercises activate the transverse abdominis (the deep stabilizing muscle that pulls your stomach in) and the rectus abdominis (the visible six-pack muscle) simultaneously, while protecting your lower back.

The 7 exercises in this guide follow a simple principle: progressive challenge. You start with stability-based movements (dead bugs, planks) that teach your nervous system proper core recruitment. Then you progress to dynamic anti-rotation exercises (bird dogs, Pallof presses) that build real-world functional strength. Finally, you add resistance-based movements (ab wheel, leg raises) that create the muscle definition you see. This progression works because it respects how your body actually adapts after 40.

Exercise 1: Dead Bug—The Foundation Core Builder

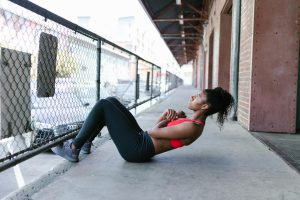
7 Core Exercises for Toned Stomach workout technique step by step

The dead bug is the single best starting point for core training after 40. It teaches your nervous system to stabilize your spine while moving your limbs—exactly what your core needs to do in real life. Unlike crunches, dead bugs keep your spine in neutral position, eliminating the injury risk and lower back strain that kills motivation.

Proper Form and Setup:

  • Starting position: Lie flat on your back on a yoga mat or padded surface. Press your lower back gently into the mat (neutral spine). Raise both arms straight toward the ceiling. Bend both knees 90 degrees so your shins are parallel to the floor.
  • The movement: Simultaneously lower your right arm overhead (keeping it close to the mat) while straightening your left leg (heel hovering 2-3 inches above the floor). Return to start. Repeat on the opposite side. That’s 1 rep.
  • Critical form cue: Your lower back should never arch off the mat. If it does, your core isn’t engaged properly—press harder into the mat and reduce your range of motion.
  • Sets and reps: Beginner: 2 sets × 10 reps per side (20 total reps) with 60 seconds rest. Intermediate: 3 sets × 15 reps per side with 45 seconds rest. Advanced: 3 sets × 20 reps per side with 30 seconds rest.
  • Breathing: Exhale as you extend. Inhale as you return. Never hold your breath—this elevates intracranial pressure unnecessarily.

For detailed form guidance, read our complete guide: How to Do the Dead Bug Exercise Correctly: Complete Form Guide 2024. This exercise is the foundation—master it before moving to harder variations.

💪

Coach Alex’s Note:In my 8 years coaching clients over 40, I’ve noticed that 90% of people rush through dead bugs because they seem “too easy.” The moment they slow down and focus on keeping their lower back pinned to the floor, their ab soreness doubles. That discomfort means your core is finally working properly—don’t skip it just because it doesn’t feel intense.

Exercise 2: Modified Plank for Core Endurance Without Back Strain

Planks are deceptively difficult—and they’re even more valuable after 40 because they force your entire core to stabilize your spine under load for sustained periods. The key word is modified. Full planks with locked elbows often create shoulder impingement in people over 40 who lack mobility. The modified plank eliminates this while building the same core strength.

Proper Form and Setup:

  • Starting position: Lie face-down on a yoga mat. Place your forearms on the ground with elbows directly under your shoulders. Your body should form a straight line from head to knees (not feet initially).
  • The position: Engage your glutes and core to prevent your hips from sagging. Your elbows stay planted. You’re not pushing or moving—you’re simply holding this position while breathing steadily.
  • Critical form cue: Your hips must not sag toward the floor. If they do, lower your knees or reduce duration. Sagging means your core is disengaging, and you’re shifting strain to your lower back.
  • Duration and progression: Beginner: 3 sets × 20-30 seconds with 60 seconds rest. Intermediate: 3 sets × 45-60 seconds with 45 seconds rest. Advanced: 4 sets × 90+ seconds with 30 seconds rest.
  • Breathing: Breathe steadily throughout. Inhale for 4 counts, exhale for 4 counts. Never hold your breath.

If you have access to an Abdominal Wheel Exercise Device, you can progress beyond standard planks into dynamic core training. But master the plank first—it’s your foundation for safe core work.

📊 Did You Know? According to the American Council on Exercise (ACE), people over 40 who perform planks 3 times per week for 6 weeks increase their core stability by 41% and report 68% less lower back pain during everyday activities like lifting, bending, and sitting.

Exercise 3: Bird Dog—Anti-Rotation Core Strength

Bird dogs are exceptionally valuable after 40 because they train your core to resist rotation—a movement pattern that protects your spine during real-world activities like reaching across your body, swinging a golf club, or picking up a child. This exercise also activates the deep stabilizers in your lumbar spine, reducing injury risk.

Proper Form and Setup:

  • Starting position: Start on your hands and knees on a yoga mat. Hands directly under shoulders. Knees directly under hips. Your spine is neutral (not sagging, not hyperextended).
  • The movement: Simultaneously extend your right arm forward (overhead level, not higher) and your left leg back (hip-level, not higher). Squeeze your right glute and left core. Pause for 1 second. Return to start. Repeat on the opposite side.
  • Critical form cue: Do not let your hips rotate. Your hips must stay square to the floor throughout the movement. If they twist, your core isn’t engaged—regress to smaller range of motion.
  • Sets and reps: Beginner: 2 sets × 10 reps per side with 60 seconds rest. Intermediate: 3 sets × 15 reps per side with 45 seconds rest. Advanced: 3 sets × 20 reps per side with 30 seconds rest.
  • Progression: Once comfortable, add a 1-2 second hold at full extension. This increases time under tension and core activation.

Exercise 4: Pallof Press for Functional Core Power

The Pallof press is one of the most underrated core exercises for people over 40. It trains your core to resist rotation under load—something crunches never do. This translates directly to real-world strength: better posture, reduced back pain, and functional power in sports and daily life.

What You’ll Need: A resistance band anchored at chest height (door anchor, cable machine, or sturdy pole). Start with light resistance—a light resistance band creates surprising challenge.

Proper Form and Setup:

  • Starting position: Stand perpendicular to your anchor point about 2-3 feet away. Feet shoulder-width apart. Hold the band handle with both hands at chest height, elbows bent. The band should have slight tension at rest.
  • The movement: Press the band straight forward, extending your arms fully. Your torso must not rotate toward the anchor point—this is the entire point of the exercise. Pause 1 second. Return to chest. That’s 1 rep.
  • Critical form cue: Your core’s job is to prevent rotation. If your shoulders or hips turn toward the anchor point, the resistance is too heavy. Choose lighter resistance and focus on maintaining a perfectly square stance.
  • Sets and reps: Beginner: 2 sets × 10 reps per side with 60 seconds rest. Intermediate: 3 sets × 12 reps per side with 45 seconds rest. Advanced: 3 sets × 15 reps per side with 30 seconds rest.
  • Progression: Increase band resistance or stand farther from the anchor point to increase the rotational force your core must resist.
💡 Pro Tip from Coach Alex: Most people make Pallof presses harder by using heavier resistance. The real progression is to hold the pressed position for 2-3 seconds while consciously bracing your core—this forces your deep stabilizers to work harder and faster. Heavier resistance often leads to sloppy form and rotation, which defeats the purpose.

Exercise 5: Abdominal Wheel Rollout—Elite Core Definition

The ab wheel rollout is an advanced movement that creates visible abdominal definition faster than almost any other core exercise. It demands extreme core stability while you’re under progressive load—exactly what builds the muscle tension required for visible muscle growth. This is where you see dramatic aesthetic results after 40.

What You’ll Need: An Abdominal Wheel Exercise Device (also called an ab roller). This is a small wheel on a handle—inexpensive and incredibly effective. Available at Aura Heaven and most fitness retailers.

Proper Form and Setup (Beginner):

  • Starting position: Kneel on a yoga mat. Place the ab wheel on the floor in front of you. Grip the handles with both hands, arms at shoulder width. Your body should form a straight line from knees to head—no sagging hips.
  • The movement: Slowly roll the wheel forward, extending your body into a near-horizontal position. Stop when your core can no longer hold neutral spine (usually about 70% extension for beginners). Roll back to start by engaging your core intensely.
  • Critical form cue: Do not let your hips sag toward the floor during the rollout. Sagging indicates your core has disengaged—stop immediately and return to start. This is not an ego lift.
  • Sets and reps: Beginner: 2 sets × 5-8 reps with 90 seconds rest. Intermediate: 3 sets × 10-12 reps with 60 seconds rest. Advanced: 3 sets × 15+ reps with 45 seconds rest.

Progression Pathway: Beginner (knees) → Intermediate (feet, half rollout) → Advanced (feet, full rollout). Only progress when you can complete all reps with perfect form and no lower back strain.

⚠️ #1 Mistake to Avoid: Rolling out too far too fast. Beginners who try full rollouts from day one often arch their lower back to compensate, placing dangerous compression on their lumbar spine. Start with 50-60% extension from your knees. Master this, then gradually extend deeper over 2-3 weeks. Patience here prevents injury and actually builds better results.

Exercise 6: Reverse Crunch—Lower Abdominal Activation

Unlike traditional crunches, reverse crunches isolate the lower abdominals and keep your spine in a safe, neutral position. This movement directly targets the lower belly—the area where people over 40 struggle most to see definition. Combined with proper nutrition, reverse crunches visibly reduce belly bloat within 2-3 weeks.

Proper Form and Setup:

  • Starting position: Lie flat on your back on a yoga mat. Press your lower back gently into the mat. Legs bent 90 degrees, knees together. Arms at your sides with palms down for stability.
  • The movement: Use your lower abdominals to lift your knees toward your chest, curling your pelvis backward (rolling your sacrum off the floor). Your knees should move about 6-8 inches closer to your chest. Pause 1 second at the top. Lower with control. That’s 1 rep.
  • Critical form cue: The movement is small and controlled. Don’t swing your knees or use momentum. Your lower back should remain in light contact with the mat throughout. This is an abdominal movement, not a hip flexor movement.
  • Sets and reps: Beginner: 2 sets × 12 reps with 60 seconds rest. Intermediate: 3 sets × 15 reps with 45 seconds rest. Advanced: 3 sets × 20 reps with 30 seconds rest.
  • Progression: Add a 2-second pause at the top, or place your hands across your chest (removing arm support) to increase difficulty.

Exercise 7: Lying Leg Raises—Advanced Core and Hip Flexor Training

Lying leg raises demand extreme core stability while your heavy legs create forward-loading stress. This builds serious core strength and visible abdominal definition. However, this exercise is advanced and requires a solid foundation. Only perform leg raises after you’ve mastered the first six exercises for 2-3 weeks.

Proper Form and Setup:

  • Starting position: Lie flat on your back on a yoga mat. Press your lower back firmly into the mat (this is critical—never let it arch). Arms at your sides with palms down for stability. Legs extended straight, heels on the floor.
  • The movement: Keeping your legs straight, raise both legs to about 45 degrees (not higher initially). Pause 1 second. Lower with control, stopping about 2-3 inches above the floor (don’t rest on the floor). That’s 1 rep.
  • Critical form cue: Your lower back must remain pressed into the mat throughout. If your back arches off the floor, stop immediately—this means your core cannot handle the load. Reduce range of motion (raise legs higher, to 60-70 degrees) until your lower back stays flat.
  • Sets and reps: Beginner: 2 sets × 8 reps with 90 seconds rest. Intermediate: 3 sets × 10-12 reps with 60 seconds rest. Advanced: 3 sets × 15+ reps with 45 seconds rest.
  • Progression: Lower your legs closer to the floor (to 20-30 degrees) to increase difficulty. Add ankle weights or a resistance band for advanced challenge.
Exercise Beginner Sets/Reps Intermediate Sets/Reps Advanced Sets/Reps
Dead Bug 2 × 10/side 3 × 15/side 3 × 20/side
Modified Plank 3 × 20-30 sec 3 × 45-60 sec 4 × 90+ sec
Bird Dog 2 × 10/side 3 × 15/side 3 × 20/side
Pallof Press 2 × 10/side 3 × 12/side 3 × 15/side
Ab Wheel Rollout 2 × 5-8 3 × 10-12 3 × 15+
Reverse Crunch 2 × 12 3 × 15 3 × 20
Lying Leg Raises 2 × 8 3 × 10-12 3 × 15+

Your 30-60 Day Core Progression Program

Now that you understand each exercise, here’s exactly how to program them for visible results in 30-60 days. The key is progressive overload—you’re slowly increasing volume, resistance, or duration each week to force your muscles to adapt and grow.

Weeks 1-2: Foundation Phase (3 workouts per week)

Focus: Learning perfect form and establishing the mind-muscle connection. Quality over quantity. Perform these 4 exercises:

  • Dead Bug: 2 sets × 10 reps per side
  • Modified Plank: 3 sets × 20-30 seconds
  • Bird Dog: 2 sets × 10 reps per side
  • Reverse Crunch: 2 sets × 12 reps

Rest 60 seconds between sets. You should feel like you have 2-3 more reps in the tank. That’s the right intensity. Perform this routine Monday, Wednesday, Friday. Include a 5-minute walk or gentle stretching before each session.

Weeks 3-4: Integration Phase (3-4 workouts per week)

Add resistance and duration. You should start feeling your abs working. Perform these 5 exercises:

  • Dead Bug: 3 sets × 12 reps per side
  • Modified Plank: 3 sets × 40-50 seconds
  • Bird Dog: 3 sets × 12 reps per side
  • Pallof Press: 2 sets × 10 reps per side (light band resistance)
  • Reverse Crunch: 3 sets × 15 reps

Rest 45-50 seconds between sets. You should feel moderate fatigue. Add a 4th workout if desired (e.g., Saturday with lighter weight). If you can perform all reps with 2+ extra reps remaining, increase reps by 2-3 next week.

Weeks 5-6: Advanced Phase (4 workouts per week)

All 7 exercises. This is where visible definition begins to emerge. You should see noticeable abdominal muscle definition by the end of week 6:

  • Dead Bug: 3 sets × 15 reps per side
  • Modified Plank: 3 sets × 50-60 seconds
  • Bird Dog: 3 sets × 15 reps per side
  • Pallof Press: 3 sets × 12 reps per side (moderate band resistance)
  • Ab Wheel Rollout: 2 sets × 8 reps (knees)
  • Reverse Crunch: 3 sets × 15 reps
  • Lying Leg Raises: 2 sets × 8 reps

Rest 40-45 seconds between sets. Perform Monday, Tuesday (lighter), Thursday, Saturday. Include at least one 20-30 minute walk or moderate cardio session on Wednesday or Sunday for fat loss and recovery.

Nutrition for Visible Abs After 40:

Exercise creates the muscle. Nutrition reveals it. To see your abs, you need visible abdominal muscle definition, which requires two things:

  • Adequate protein: Aim for 0.8-1.0 gram per pound of body weight. This prevents muscle loss during the caloric deficit required for fat loss and supports recovery after training.
  • Slight caloric deficit: Reduce calories by 300-500 per day below maintenance. This encourages fat loss without excessive hunger or fatigue. A good starting point: multiply your

    Get Free Weekly Workout Plans

    Join Coach Alex every week for:

    ✅ Proven home workout plans   ✅ Nutrition tips   ✅ Gear reviews

    Subscribe Free — No Spam Ever →

Enjoying this guide?

Share it with someone who needs it 👇

📌 Pinterest
📘 Facebook
𝕏 Twitter

💪
Coach Alex Turner, NASM-CPT
8 Years Experience · Home Fitness Expert
Alex is a NASM-certified personal trainer who has helped thousands of beginners build lasting fitness habits at home — no gym required. His no-fluff approach focuses on what actually works for real people with busy lives. Find his recommended gear at Aura Heaven.

7 Core Exercises for Toned Stomach After 40: 30-Day Results Pinterest
🏋
The AuraFit Guide Team

Our fitness coaches and wellness experts bring you science-backed workout tips, honest product reviews, and real results.

Leave a Comment

Your email address will not be published. Required fields are marked *

Scroll to Top
fXP
FREE DOWNLOAD

Get Coach Alex's 30-Day Workout Plan (No Gym Needed)

1,247+ readers already getting results

Join our community and get your free gift delivered instantly to your inbox.

No thanks, I prefer being out of shape.