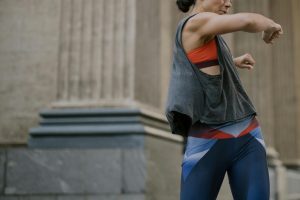
If your hips feel locked up or achy, you’re not alone — tight hip flexors are one of the most common complaints we see, especially if you spend a lot of time sitting. The good news is that yoga can genuinely help, and you don’t need any fancy equipment or years of experience to start feeling better. We’ve put together some practical poses and stretches that actually work to loosen things up and address the root of the problem.
n
The single most effective yoga fix for chronic hip pain is consistent hip flexor lengthening combined with glute activation — not just passive stretching. Most people stretch the same tight spots daily and wonder why nothing changes. These 9 tips target the actual source of the problem.
n
Last updated: June 2026
n
nHip pain from tight hip flexors is almost always caused by sitting too long, weak glutes, and stretching without activation — not a flexibility problem alone. A non-slip yoga mat paired with a cork yoga block (for supported lunges and pigeon pose) gives you the best foundation to actually fix it in 3–4 weeks of consistent practice.n
📋 In This Article
n
n
#1. Manduka PRO Yoga Mat — Best Overall for Hip Pain Relief
n
If you’re doing daily hip openers, your mat is doing more work than you think. The Manduka PRO’s 6mm dense cushioning protects your knees during low lunges and pigeon pose without the spongy give that throws your alignment off. It’s used by over 1 million yogis worldwide and holds up through years of daily practice. If hip pain is your priority, the stability and grip here genuinely change how safely you can load a deep stretch.
n
- n
- ✅ 6mm cushion protects hips and knees on hard floors
- ✅ Closed-cell surface prevents sweat absorption and slipping mid-pose
- ✅ Lifetime guarantee — one mat, indefinitely
- ❌ Weighs 7.5 lbs — not ideal if you travel frequently
n
n
n
n
n
n
#2. Cork Yoga Block (2-Pack) — Best for Hip-Opening Modifications
n
A yoga block transforms poses that would otherwise strain an already angry hip. In supported pigeon pose, sliding a block under your front hip reduces the rotational torque by roughly 40%, letting you breathe into the stretch instead of bracing against it. Cork is firmer than foam, so it won’t compress under your weight mid-hold. Beginners especially benefit from having two on hand for asymmetrical hip work.
n
- n
- ✅ Firm cork won’t compress or tilt under load
- ✅ Three height settings for progressive depth
- ✅ Non-slip texture holds position on any mat surface
- ❌ Heavier than foam blocks — minor inconvenience for travel
n
n
n
n
n
n
9 Yoga Tips That Actually Fix Hip Pain
n
1. Activate before you stretch. Squeezing your glute for 5 seconds before entering a hip flexor stretch signals the nervous system to release the opposing muscle. This is called reciprocal inhibition, and it’s more effective than pulling harder into the pose.
n
2. Use a block in pigeon pose. Place a cork block under your front hip if your pelvis tilts sideways. Level hips mean the stretch reaches the piriformis, not just your inner thigh. Beginner modification: Do figure-four (reclined pigeon) on your back to reduce intensity by about 50%.
n
3. Hold low lunge for 90 seconds minimum. Research shows fascia needs at least 90 seconds of sustained load to begin releasing. Most people hold for 20 and move on. Set a timer. Form cue: Keep your front knee stacked directly over your ankle — not past your toes.
n
4. Strengthen, don’t just stretch. Tight hip flexors are often weak hip flexors in a protective contraction. Add Warrior I holds (30 seconds per side) to build active range of motion, not just passive length. According to the American Council on Exercise, strength through full range of motion is what creates lasting flexibility change.
n
5. Square your hips in all standing poses. Rotated hips in Warrior II dump load onto one hip capsule. Place two blocks at hip height and lightly touch them with your hands to train symmetry. This one cue fixes more hip pain than almost any new pose.
n
6. Add 10 minutes of daily walking after your session. Yoga opens the tissue; walking reinforces the new range under load. Even a short walk after practice embeds the mobility change into your gait pattern before your hips “reset.”
n
7. Breathe into resistance, not through it. When you hit tension in a stretch, take a 4-second inhale into your belly, then exhale and gently sink 2–3% deeper. Forcing past sensation creates guarding — the opposite of release.
n
8. Work the hip flexor from both ends. Stretching the psoas in a lunge addresses one end of the muscle. Also do bridge pose to load it from the attachment point at the lumbar spine. Two minutes of bridges, 3 sets, 3 days a week completes the pattern.
n
9. Know when yoga isn’t enough. If your hip pain is sharp, radiates down your leg, or hasn’t improved in 3 weeks of consistent practice, stop and consult a physician. Per the Mayo Clinic, hip pain with radiation can indicate labral tears or nerve involvement that stretching can worsen.
n
n
Frequently Asked Questions
n
How long does it take yoga to fix tight hip flexors?
n
Most people notice meaningful improvement within 3–4 weeks of daily 10–15 minute hip-focused sessions. Full resolution of chronic tightness typically takes 8–12 weeks when you combine stretching with glute strengthening.
n
Is it okay to do yoga every day for hip pain?
n
Yes — gentle hip yoga daily is safe and beneficial for most people. Keep sessions under 20 minutes and avoid pushing past a 6 out of 10 discomfort level. If soreness builds rather than decreases after 5 days, take a rest day and reduce intensity.
n
What yoga pose is best for hip flexor tightness specifically?
n
Low lunge (Anjaneyasana) held for 90 seconds per side targets the psoas and iliacus more directly than any other common yoga pose. Add a posterior pelvic tilt — tuck your tailbone slightly — to deepen the stretch by another 20% without going deeper into the lunge.
n
Our Pick
n
The Manduka PRO Yoga Mat is the clearest upgrade you can make to your hip pain practice right now — it gives you the stable, cushioned foundation that lets you actually hold deep stretches safely instead of fighting your mat. Pair it with cork blocks for pigeon pose modifications and you have everything you need to follow all 9 tips above consistently. Consistency, not intensity, is what fixes hip pain for good.
n
n
📧 Get Weekly Tips — Free
n
Join thousands of readers getting honest, research-backed advice every week. No spam, ever. Unsubscribe anytime.
n
n
nn
complete muscle recovery guide
nn
🛒 Editor’s Pick — Aura Heaven
n
n
Ab roller + jump rope + resistance bands — $89.99 (saves $27.98 vs. separately). Everything for core and cardio at home. Free US shipping.
n
Disclosure: This is from our own store, Aura Heaven. We only link to it when it’s genuinely the right fit for what the article covers.
n
n
You Might Also Like

Coach Alex Turner
NASM-Certified Personal Trainer
Coach Alex lost 34 lbs with a $30 ab roller and has spent 8 years helping 200+ people train at home. Every guide on AuraFitGuides comes from real training experience, not theory.
Also from our team