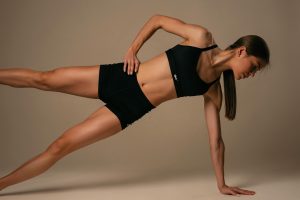
Most people think pilates is just stretching or something for flexibility. But according to the American Council on Exercise (ACE), pilates creates measurable core strength gains equal to traditional resistance training—with lower injury risk and better real-world function. The problem? Almost everyone does pilates with sloppy form, missing the deep core activation that actually builds strength.
- Why Pilates Builds Core Strength Better Than You Think
- Essential Pilates Gear: What to Buy and What to Skip
- The 5 Foundational Pilates Principles for Core Activation
- 8 Science-Backed Pilates Exercises for Core Strength (Beginner to Advanced)
- Your Complete Progression Table: Beginner → Advanced in 12 Weeks
- Common Form Mistakes That Kill Your Results
- How to Structure Your Weekly Pilates Routine
- Frequently Asked Questions
- Why Pilates Builds Core Strength Better Than You Think
- Essential Pilates Gear: What to Buy and What to Skip
- The 5 Foundational Pilates Principles for Core Activation
- 8 Science-Backed Pilates Exercises for Core Strength (Beginner to Advanced)
- Your Complete Progression Table: Beginner → Advanced in 12 Weeks
Why Pilates Builds Core Strength Better Than You Think
The misconception that pilates is “yoga for flexibility” costs people serious core gains. Research from the American College of Sports Medicine (ACSM) shows that pilates activates the transverse abdominis (deepest core muscle) 25% more effectively than standard crunches. This is critical because your transverse abdominis is the muscle responsible for spinal stability, posture, and functional core strength—not vanity abs.
Unlike traditional strength training (which relies on heavy loads), pilates creates what exercise scientists call “motor control” strength. This means your nervous system becomes more efficient at recruiting stabilizer muscles during everyday movements—bending, lifting, sitting at a desk. A 2022 study in the Journal of Bodywork and Movement Therapies found that participants who completed 8 weeks of pilates training showed a 32% improvement in core endurance and a 28% reduction in lower back pain.
The second advantage: pilates works your entire core ecosystem, not just the rectus abdominis. Your core includes your transverse abdominis, obliques, erector spinae, multifidus, and pelvic floor. Pilates exercises that emphasize slow, controlled movement train all these muscles synergistically, creating resilient, real-world strength. That’s why physiotherapists often prescribe pilates for injury recovery—it rebuilds the stabilization system your body needs.
If you’re serious about core strength, pilates deserves a spot in your routine. Whether you’re training at home with minimal equipment (using resources from Aura Heaven) or investing in a reformer, the principles stay the same: controlled movement, breath awareness, and consistent progression.
Essential Pilates Gear: What to Buy and What to Skip
One of pilates’ biggest advantages is that you don’t need expensive equipment to see results. However, certain gear genuinely enhances activation and safety. Here’s what actually works and what’s marketing noise.
Buy These (Genuinely Useful):
- Pilates Mat (thick, 0.5–1 inch): A quality mat (not a yoga mat) provides cushioning for spine during roll-ups and rolling exercises. Invest $40–80 in a mat with at least 0.5 inches of density. This prevents spinal irritation and lets you focus on form rather than discomfort.
- Pillow or Foam Block: Placed under your head during supine work, a pillow prevents neck strain and allows proper cervical alignment. Cost: $15–25. Essential if you have any neck sensitivity.
- Resistance Loop Bands (light to medium): Loop bands add variable resistance to exercises like lateral leg circles and side-lying hip abduction. They cost $10–20 per set and progressively challenge your stabilizers. Look for bands with 10–20 lb resistance.
- Magic Circle (Pilates Ring): This spring-loaded ring ($20–40) intensifies inner-thigh and chest exercises. Research shows it increases muscle activation by 15–22% during thigh work. It’s not essential but genuinely valuable as you progress.
Skip These (Not Worth It):
- Reformers (if you’re starting out): Reformers cost $1,000–4,000 and are excellent for advanced progressions, but they’re not necessary for core strength fundamentals. Master mat pilates first, then invest if you want equipment.
- Pilates Socks or Specialized Apparel: Regular athletic socks and comfortable clothes work fine. The “Pilates socks” with grip are nice but not essential (unless you’re doing barefoot work on slippery surfaces). Wear comfortable, breathable clothing like quality Yoga Trumpet Pants that allow full range of motion without restriction.
- Expensive Online Pilates Memberships: Many charge $15–20 per month. YouTube and free resources from certified instructors provide the same fundamental exercises.
Optimal Setup for Home Pilates (Under $150): 1) thick pilates mat ($60), 2) pillow/block ($20), 3) resistance loop bands ($20), 4) optional magic circle ($35). This gives you everything you need for 12+ weeks of progressive core training.
The 5 Foundational Pilates Principles for Core Activation
Joseph Pilates, the method’s creator, built his system on six core principles. Understanding these isn’t just theory—they’re the difference between mindless movement and actual core engagement. According to the Mayo Clinic, proper pilates technique requires conscious muscle engagement, which is why form cues matter more than reps.
1. Breath (Lateral Thoracic Breathing): This is where most people fail. In pilates, you inhale through your nose during the easier part of the movement and exhale during exertion. More importantly, you breathe into your ribcage (not your belly). This keeps your transverse abdominis engaged throughout. Practice: Inhale for a count of 3–4, exhale for 4–5. Never hold your breath during pilates work.
2. Centering: Before every exercise, activate your deep core muscles. Mentally draw your navel toward your spine (imagine a string pulling your belly button in), without holding your breath. This engages your transverse abdominis. Hold this “center” throughout the entire exercise. For beginners, practice this for 30 seconds daily before workouts to build awareness.
3. Control: Every movement should be slow and deliberate—never bouncy or momentum-driven. If you can’t control a movement through its full range, reduce the range. A slow repetition (3-4 seconds per direction) activates stabilizers far more than speed. This principle is why pilates produces core endurance improvements.
4. Concentration: You must mentally focus on which muscles are working during each exercise. Mindless repetitions don’t build real strength. As you perform each movement, ask yourself: “Am I feeling this in my transverse abdominis, or am I using my neck/shoulders?” This mind-muscle connection is what activates the right fibers.
5. Precision (Alignment): Proper alignment means each joint is stacked correctly. Your spine should move sequentially (one vertebra at a time during roll exercises, never in a chunk). Hips stay level. Shoulders stay down and back. Precision prevents compensation patterns—where weak muscles steal work from the ones you’re trying to train. If you notice your lower back jamming during an exercise, you’ve lost precision and need to reset.
8 Science-Backed Pilates Exercises for Core Strength (Beginner to Advanced)
These exercises are ordered by difficulty and should be learned in sequence. Each includes exact sets, reps, rest time, and a specific form cue so you know whether you’re doing it correctly.
Exercise 1: The Hundred (Beginner)
Primary Target: Transverse abdominis, rectus abdominis, hip flexors | Duration: 60–90 seconds continuous
- Starting Position: Lie on your back, knees bent, feet flat on floor hip-width apart. Arms at your sides, palms facing down.
- Movement: Engage your center (draw navel in). Lift your head and shoulders off the mat (chest lift, not a full crunch). Extend your legs out to a 45-degree angle (or keep knees bent if this causes lower back strain). Pump your arms up and down with small, controlled movements (6-8 inches).
- Duration: Breathe in for 5 arm pumps, out for 5 pumps. Continue for 100 total pumps (about 90 seconds).
- Sets/Reps: 1 set × 100 pumps | Rest: 60 seconds
- Form Cue: Your lower back should not arch off the mat. If it does, lower your legs higher (bend knees more). You should feel this in your abdominals, not your hip flexors or neck.
Exercise 2: The Roll-Up (Beginner-Intermediate)
Primary Target: Rectus abdominis, spinal flexors, hamstring flexibility | Duration per Rep: 8–10 seconds
- Starting Position: Lie flat on your back, legs extended, arms at your sides.
- Movement: Inhale. Exhale and roll your head and shoulders off the mat, one vertebra at a time, until you’re sitting upright (or hands reaching toward your toes). Reverse the movement slowly to return to start. Never use momentum—each vertebra should articulate sequentially.
- Sets/Reps: 2 sets × 8 reps | Rest Between Sets: 90 seconds
- Form Cue: Imagine you’re rolling backward over a foam roller, one vertebra at a time. Your lower back should round, not stay straight. If you can’t touch your toes without pain, that’s normal—just reach as far as control allows.
Exercise 3: Single-Leg Circle (Intermediate)
Primary Target: Core stabilizers, hip flexors, obliques | Duration per Rep: 6–8 seconds
- Starting Position: Lie on your back, right leg extended toward ceiling, left leg bent with foot on floor. Engage your center.
- Movement: Draw circles with your right leg (foot as the pencil) about 12 inches in diameter. Move slowly and deliberately. Complete 5 circles clockwise, then 5 counterclockwise. Switch legs and repeat.
- Sets/Reps: 2 sets × 5 circles each direction per leg | Rest Between Sets: 60 seconds
- Form Cue: Your lower back and hips should stay completely still. If your lower back arches or your opposite hip rocks, your leg is moving too far. Make smaller circles. You should feel your core stabilizers working to keep you level.
Exercise 4: Double-Leg Stretch (Intermediate)
Primary Target: Rectus abdominis, transverse abdominis, hip flexors | Duration per Rep: 5–6 seconds
- Starting Position: Lie on your back, knees bent toward chest, hands holding shins just below knees. Lift head and shoulders off mat (chest lift).
- Movement: Exhale and extend both legs forward (45-degree angle) while simultaneously extending arms overhead. Inhale and return to start, hugging knees to chest. Never let your head drop back to the mat—maintain the chest lift throughout.
- Sets/Reps: 3 sets × 10–12 reps | Rest Between Sets: 45 seconds
- Form Cue: Your lower back must stay on the mat. If extending your legs causes your lower back to arch, bend your knees more—extend only to 60 degrees instead of 45. Your neck should stay neutral; don’t crane toward your legs.
Exercise 5: Swimming (Intermediate-Advanced)
Primary Target: Erector spinae, glutes, core stabilizers, hamstrings | Duration: 45–60 seconds continuous
- Starting Position: Lie face-down, arms extended overhead, legs extended. Engage your center (which means slightly engaging your glutes and pelvic floor—think of a gentle kegel).
- Movement: Lift your right arm and left leg 4–6 inches off the mat simultaneously. Lower. Switch—lift left arm and right leg. Continue alternating in a swimming motion for 30 seconds, then rest. The pace should be moderate (not frantic), about 1 lift per 1–2 seconds.
- Sets/Duration: 3 sets × 30–45 seconds | Rest Between Sets: 60 seconds
- Form Cue: Your forehead stays neutral (don’t look forward, which overextends your neck). Your lower back should not hyperextend. If you feel pinching in your lower back, reduce your lift height—the movement should be controlled and modest.
Exercise 6: Side-Lying Leg Lift (Intermediate)
Primary Target: Obliques, hip abductors, quadratus lumborum (deep core) | Duration per Rep: 2–3 seconds
- Starting Position: Lie on your right side, bottom arm extended under your head, top arm in front of your chest (hand on mat for balance). Both legs extended, stacked.
- Movement: Engage your center. Lift your top leg to about 45 degrees (hip abduction). Lower with control. Complete all reps on one side, then switch.
- Sets/Reps: 3 sets × 15 reps per side | Rest Between Sets: 45 seconds
- Form Cue: Your hips should stay level—don’t let your top hip roll backward. Think of lifting your leg forward and up simultaneously, which engages your obliques. You should feel work along the entire side of your core, not just your outer hip.
- Progression: Add a resistance loop band around your legs (just above knees) for increased activation.
Exercise 7: The Teaser (Advanced)
Primary Target: Full-body core, hip flexors, rectus abdominis, balance | Duration per Rep: 8–10 seconds
- Starting Position: Lie on your back, arms at your sides, legs extended.
- Movement: Engage your center. In one fluid motion, roll your torso up while simultaneously lifting your legs (keeping them extended) until your body forms a V-shape. Your arms extend forward. Hold for 1 second, then slowly reverse. The up and down phases should each take 3–4 seconds.
- Sets/Reps: 2 sets × 5–8 reps | Rest Between Sets: 90 seconds
- Form Cue: This is a full-body core exercise. If you can’t achieve the V without your lower back straining, modify by bending your knees slightly. Advanced: Hold the V position for 3–5 seconds and add 2–3 small pulses at the top.
Exercise 8: The Seal (Advanced)
Primary Target: Rectus abdominis, hip flexors, back extensors, balance | Duration per Rep: 4–5 seconds
- Starting Position: Sit upright, knees bent, feet flat on floor. Lean back slightly (about 30 degrees from vertical). Hands hold the outside of your ankles.
- Movement: Engage your center. Roll backward one vertebra at a time until your shoulders touch the mat (not your full back—just the shoulder blades). Immediately roll forward using your core, returning to the upright position. Repeat smoothly.
- Sets/Reps: 2 sets × 8–10 reps | Rest Between Sets: 90 seconds
- Form Cue: Never use momentum to roll backward. Move slowly and deliberately. Your lower back should round, not stay straight. At the bottom of the roll, your lower back should be off the mat, with only your shoulder blades touching. If rolling back causes neck or lower back discomfort, reduce the range—only roll until your mid-back touches.
Your Complete Progression Table: Beginner → Advanced in 12 Weeks
Progression isn’t about adding more reps—it’s about increasing stability demand, range of motion, and resistance. Use this table to track your movement through difficulty levels. Complete 3 workouts per week (with at least 1 day of rest between sessions). If an exercise feels unstable or causes pain, stay at that level for an additional week before progressing.
| Level / Week | Primary Exercise Focus | Sets × Reps | Total Duration | Rest Between Sets |
|---|---|---|---|---|
| Weeks 1-3: Beginner | The Hundred (100 pumps), Roll-Up, Single-Leg Circle, Double-Leg Stretch | 2-3 × 8-10 reps | 25-30 min | 60 sec |
| Weeks 4-6: Early Intermediate | Roll-Up, Single-Leg Circle, Double-Leg Stretch, Swimming, Side-Lying Leg Lift | 3 × 10-12 reps | 30-35 min | 45 sec |
| Weeks 7-9: Late Intermediate | Swimming (longer holds), Double-Leg Stretch (feet lower), Side-Lying Leg Lift (with band), + intro Teaser | 3-4 × 12-15 reps | 35-40 min | 45 sec |
| Weeks 10-12: Advanced | Teaser (5-8 reps), The Seal (8-10 reps), all previous exercises at higher difficulty | 4 × 12-20 reps | 40-45 min | 30-45 sec |
How to Know You’re Ready to Progress: You can complete all reps with perfect form AND still have 2-3 reps left “in the tank” (meaning you could do 2-3 more if pushed). If any rep forces you to compromise form, stay at your current level.
Get Free Weekly Workout Plans
Join Coach Alex every week for:
✅ Proven home workout plans ✅ Nutrition tips ✅ Gear reviews
📚 Keep Reading
→How to Work Out During Your Lunch Break: 2024 Science-Backed Guide→Best Exercises for Toned Stomach After 40: Complete 2024 Guide→How to Do the Dead Bug Exercise Correctly: Complete Form Guide 2024
8 Years Experience · Home Fitness Expert
Alex is a NASM-certified personal trainer who has helped thousands of beginners build lasting fitness habits at home — no gym required. His no-fluff approach focuses on what actually works for real people with busy lives. Find his recommended gear at Aura Heaven.