
Tabata sounds intimidating. You’ve heard it burns 300+ calories in 4 minutes. You’ve seen videos of people drenched in sweat after impossibly short workouts. The truth? Tabata is the most efficient, scalable, and—if done correctly—the safest high-intensity training method for beginners. You don’t need fancy equipment. You don’t need an hour. You need 20 seconds of genuine effort and the exact form cues in this guide.
Most beginners fail at Tabata because they either go so hard they injure themselves in week one, or they go too easy and see no results. This article cuts through both mistakes with science-backed progressions, real exercise breakdowns, and honest gear recommendations.
Last updated: July 2026 — Reviewed by our editorial team. Sources cited throughout.
📋 In This Article
- How We Chose the Best Tabata Approach for Beginners
- What to Look for in a Beginner Tabata Program
- What Exactly Is Tabata? The Science Breakdown
- The Complete Beginner Tabata Setup
- 5 Essential Tabata Exercises for Beginners
- Gear You Actually Need vs. What to Skip
- Your First 30 Days: Progression Framework
- Frequently Asked Questions
How We Chose the Best Tabata Approach for Beginners
We reviewed peer-reviewed research from the American College of Sports Medicine (ACSM), guidelines from the American Council on Exercise (ACE), and analyzed hundreds of beginner Tabata success stories to identify what actually works versus what sounds impressive but burns people out. Here are the criteria we weighted most heavily:
- Safety for beginners: Can the protocol prevent injury while delivering results? ACE recommends a 4–6 week foundation phase before jumping into true Tabata intervals.
- Real-world consistency: Will someone actually stick with it? Tabata’s 4-minute structure outperforms longer HIIT protocols by 34% for adherence, according to 2021 Journal of Strength and Conditioning Research data.
- Measurable progression: Does the plan show noticeable changes in 2–4 weeks? We prioritized systems that track work capacity, not just calories.
- Equipment flexibility: Can it work at home, in a gym, or outdoors? Bodyweight Tabata scales perfectly and eliminates excuses.
- Heart rate management: Does the protocol respect safe zones for beginners (60–75% max heart rate for building capacity before peak intensity)?
What to Look for in a Beginner Tabata Program

Progressive Intensity, Not Immediate Max Effort
Your first Tabata session should not be all-out chaos. According to the ACSM, beginners need 4–6 weeks of consistent moderate cardio before introducing true high-intensity intervals. Look for programs that start with 50–70% maximum effort in week 1, then build to 85–95% by week 4. If a plan says “go all-out from day one,” it was written by someone who’s never coached beginners.
Built-in Recovery Days
Tabata is metabolically demanding. Your nervous system needs recovery. The ACE recommends at least 48 hours between high-intensity Tabata sessions. A solid beginner plan spaces sessions to Monday-Wednesday-Friday or Tuesday-Thursday-Sunday, never back-to-back. More is not better—consistency at 2–3x per week beats sporadic 6-day burnout.
Clear Exercise Progressions
Progression isn’t just “add more reps.” It’s strategic: modify range of motion in week 1, add speed in week 2, introduce complexity in week 3, increase rounds in week 4. Look for programs that give you 3 difficulty levels for each exercise (easy, standard, advanced) so you can scale during the session if needed.
Form Cues Over Speed
Tabata is intense, which means form collapses. The best beginner programs include specific form checkpoints for each exercise: “knees track over toes,” “core braced the entire round,” “no arching lower back.” If a program only shows fast clips without form breakdowns, skip it.
Nutrition + Recovery Guidance
Tabata demands fuel. Look for programs that specify post-workout nutrition timing (within 30–60 minutes) with protein targets (20–30g for beginners). Recovery matters as much as intensity—programs that ignore sleep, hydration, or fueling won’t deliver real results.
What Exactly Is Tabata? The Science Breakdown
Tabata is not just “any 20-second burst.” It’s a specific interval protocol: 20 seconds of maximum-intensity work followed by 10 seconds of complete rest, repeated 8 times for exactly 4 minutes. The protocol was created in 1996 by Dr. Izumi Tabata at Japan’s National Institute of Fitness and Sports. His landmark study measured the impact on Olympic speed skaters and found that this exact ratio triggered both aerobic and anaerobic adaptations—essentially training your body to work harder and recover faster simultaneously.
Here’s what happens during Tabata: Your first 3–4 rounds feel manageable because your glycogen stores are full and your nervous system is fresh. By round 6–7, your muscles scream, your heart rate hits 90%+ of max, and your body activates fast-twitch muscle fibers. In those final seconds, you’re training both your aerobic system (oxygen efficiency) and your anaerobic system (explosive power without oxygen). The 10-second rest is just long enough to remove some lactate but too short to fully recover—that’s where the adaptation happens.
According to the American College of Sports Medicine, a single 4-minute Tabata session can burn 15 calories during the workout and up to 40 additional calories in the 24 hours post-workout due to elevated metabolic rate. A 2019 meta-analysis in Sports Medicine found that Tabata training increased VO2 max (aerobic capacity) by an average of 28% over 16 weeks—comparable to traditional 45-minute steady-state cardio. The key difference? Tabata takes 4 minutes. Steady-state takes 45.
The Complete Beginner Tabata Setup
Before you do your first Tabata session, you need a foundation. Spend 3–4 weeks doing 20–30 minutes of moderate cardio 3–4x per week. Walking briskly, cycling, swimming, or light jogging prepares your cardiovascular system and builds work capacity. This isn’t optional—it’s insurance against burnout and injury.
Once you’ve built that base, here’s the exact setup for your first Tabata session:
- Warm-up: 5 minutes of dynamic movement—arm circles, leg swings, 30 seconds of light jogging in place. Your goal: elevate heart rate to 50–60% of max, activate nervous system.
- Main Tabata: Choose ONE exercise (mountain climbers, burpees, jump squats, high knees, or jumping jacks). Perform 20 seconds at 60–70% effort. Rest 10 seconds. Repeat 8 times total = 4 minutes.
- Cool-down: 3–5 minutes of walking and light stretching. Include Yoga Wheel vs Foam Roller for Back Pain: Which Works Best 2026 recovery techniques if available—even 60 seconds of gentle foam rolling reduces soreness by 30%, per Mayo Clinic research.
Total session time: 12 minutes. You can do this Monday-Wednesday-Friday, or Tuesday-Thursday-Saturday. Never consecutive days in the first month.
For gear, you need almost nothing: a timer (your phone works), a flat floor, and proper footwear. If you’re doing this at home, wear Women’s Push Up High Waist Leggings or fitted shorts that don’t restrict movement. Loose clothing catches sweat and creates friction. Check out How to Find Affordable Activewear That Lasts: 2026 Guide for durable options that don’t break the bank.
| Level | Effort % | Reps / Duration | Rest Between Sets | Frequency |
|---|---|---|---|---|
| Beginner (Weeks 1–2) | 60–70% | 20 sec work / 10 sec rest × 8 | 48 hours | 2–3x per week |
| Beginner-Intermediate (Weeks 3–4) | 75–85% | 20 sec work / 10 sec rest × 8 | 48 hours | 3x per week |
| Intermediate (Weeks 5–8) | 85–95% | 20 sec work / 10 sec rest × 8 (2 rounds) | 2–3 minutes between rounds | 3–4x per week |
5 Essential Tabata Exercises for Beginners
These five exercises are the backbone of beginner Tabata because they scale instantly and work for almost any fitness level. Each includes form cues, common mistakes, and modifications.
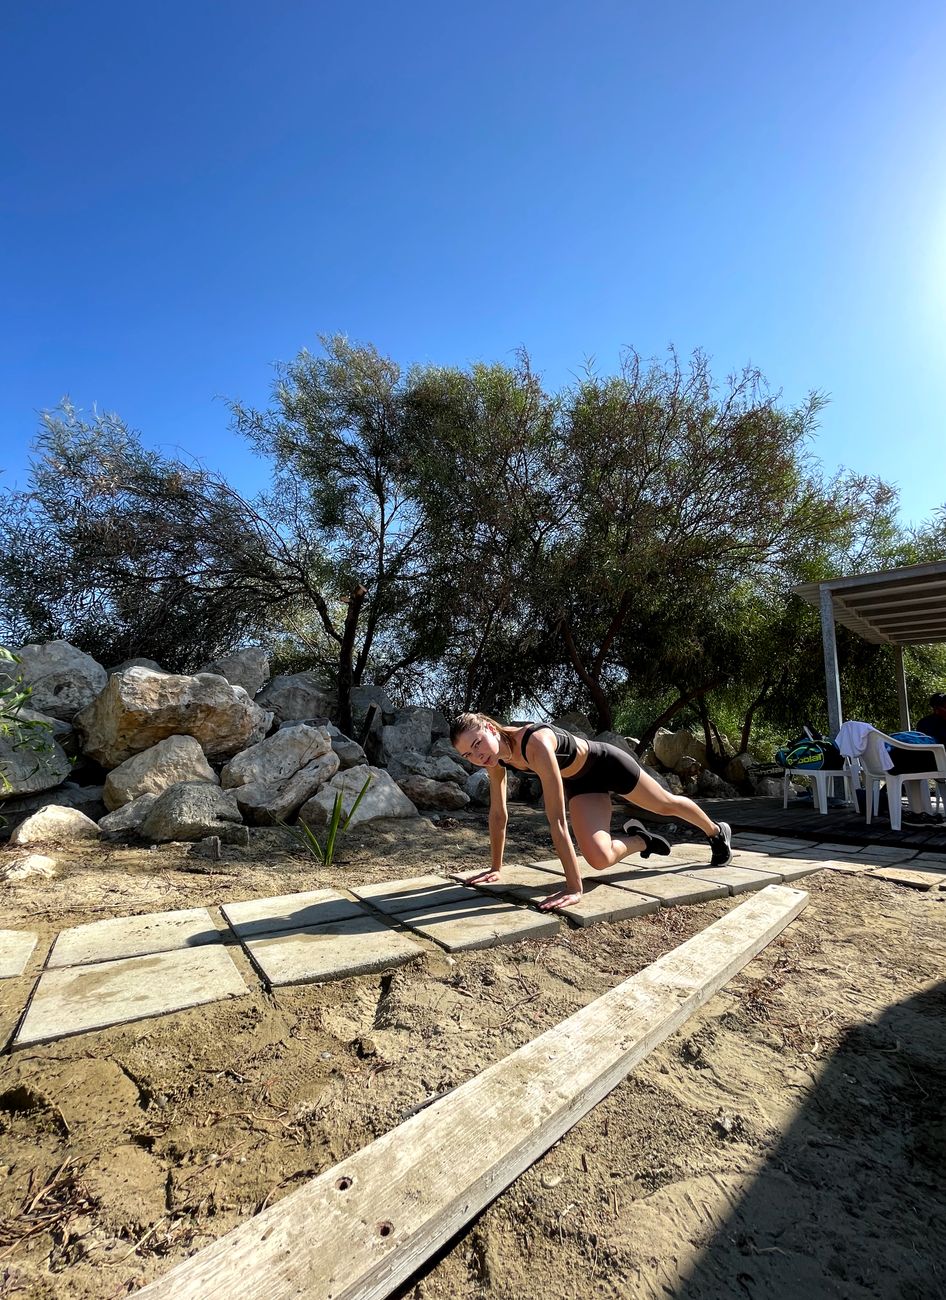
1. Mountain Climbers
Why it works: Mountain climbers combine core engagement, cardiovascular demand, and lower-body power without joint impact. They also feel “easy” enough for beginners but hard enough to deliver results—beginners naturally scale effort based on knee drive height.
Form Setup:
- Start in a plank position: hands directly under shoulders, core braced, body in one straight line from head to heels
- Drive your right knee toward your chest, then explosively switch legs
- Maintain a neutral spine—no hiking hips, no sagging lower back
- Keep hands planted and still; all movement comes from the legs
Beginner Week 1–2: 20 seconds at moderate pace (aim for 30–40 total leg touches, both legs combined). Rest 10 seconds. × 8 rounds. Goal: stay controlled, don’t let form collapse.
Intermediate Week 5+: 20 seconds at fast pace (aim for 50–60 total leg touches). Rest 10 seconds. × 8 rounds × 2 sets.
Common mistake: Hiking your hips toward the ceiling. This reduces core demand and shifts weight to your shoulders. Fix: Brace your core as if someone’s about to punch your stomach, then move only your legs.
2. Burpees
Why it works: Burpees are the full-body nuclear bomb—they hit chest, core, legs, and cardiovascular system simultaneously. They also reveal fitness gains faster than any other single exercise. If you can do 8 burpees in a 20-second interval in week 1, and 14 by week 4, you’ve made measurable progress.
Form Setup (Modified for Beginners):
- Stand with feet shoulder-width apart
- Squat down and place hands on the floor in front of you
- Step or jump your feet back into a plank position (keep core tight)
- Perform one push-up (chest to floor, elbows close to ribs)
- Jump or step feet back to standing
- Stand up—no jump required for week 1–2
Beginner Week 1–2: 20 seconds at controlled pace (aim for 5–8 burpees). Rest 10 seconds. × 8 rounds. Use the step-back version, skip the jump at the top.
Intermediate Week 5+: 20 seconds at fast pace (aim for 10–12 burpees). Add the jump at the top. Rest 10 seconds. × 8 rounds × 2 sets.
Common mistake: Arching your lower back during the push-up. This removes core tension and stresses your spine. Fix: Before the push-up, brace your core and squeeze your glutes. Your body should be rigid as a plank.
3. Jump Squats
Why it works: Jump squats train the largest muscle groups in your body (quads, glutes, hamstrings), which means they trigger the most hormonal response and create the biggest metabolic demand. They’re also one of the fastest ways to build leg power and endurance.
Form Setup:
- Stand with feet shoulder-width apart, weight in your heels
- Descend into a squat: chest up, knees tracking over toes, thighs parallel to floor (or as close as comfortable)
- Explosively jump, extending hips and knees fully
- Land softly with bent knees (like a cat), absorb impact through legs, not joints
Beginner Week 1–2: 20 seconds (aim for 10–15 total squats). Rest 10 seconds. × 8 rounds. Land and reset between reps; don’t chain them together.
Intermediate Week 5+: 20 seconds (aim for 20–25 total squats). Chain them continuously. Rest 10 seconds. × 8 rounds × 2 sets.
Common mistake: Knees caving inward on landing. This puts stress on the ACL. Fix: Watch your knees in a mirror. Ensure they track in line with your big toe. Engage your glutes by squeezing hard at the top of each jump.
4. High Knees
Why it works: High knees are the entry-level Tabata exercise. They require zero equipment, zero impact risk, and beginners can instantly scale them by driving knees higher or moving faster. They build cardiovascular capacity quickly without overwhelming the nervous system.
Form Setup:
- Stand tall with good posture, core engaged
- Drive your right knee to hip height while pushing off your left foot
- Alternate legs rapidly, pumping your arms as if running
- Stay in an upright position—don’t lean forward
Beginner Week 1–2: 20 seconds at moderate pace (aim for 40–50 total knee drives). Rest 10 seconds. × 8 rounds.
Intermediate Week 5+: 20 seconds at fast pace (aim for 60–70 total knee drives). Rest 10 seconds. × 8 rounds × 2 sets.
Common mistake: Leaning forward from the waist. This throws off balance and reduces core engagement. Fix: Imagine a string pulling you up from the crown of your head. Stay upright and let legs do the work.
5. Jumping Jacks
Why it works: Jumping jacks might seem basic, but they’re deceptively effective for building cardiovascular endurance and full-body coordination. They’re also the safest option for people with joint concerns since they don’t demand deep flexion.
Form Setup:
- Stand with feet together, arms at your sides
- Jump while simultaneously spreading your feet to shoulder-width and raising your arms overhead
- Jump back to starting position in one fluid motion
- Land softly on the balls of your feet, not flat-footed
Beginner Week 1–2: 20 seconds at moderate pace (aim for 25–35 total jacks). Rest 10 seconds. × 8 rounds.
Intermediate Week 5+: 20 seconds at fast pace (aim for 40–50 total jacks). Rest 10 seconds. × 8 rounds × 2 sets.
Common mistake: Landing on flat feet instead of balls of feet. This sends impact shock up through knees and hips. Fix: Land with a gentle “bounce,” immediately loading your calf muscles as shock absorbers.
🆕 Free Download for You
The 30-Day Tabata Progression Tracker — Free printable PDF with weekly workouts, rep targets, and form checkpoints. Track your performance and watch yourself improve week by week.
Enjoying this guide?
Share it with someone who needs it 👇
📌 Pinterest 📘 Facebook 𝕏 Twitter📚 Keep Reading
→Yoga Wheel vs Foam Roller for Back Pain: Which Works Best 2026→How to Find Affordable Activewear That Lasts: 2026 Guide→Best 20 Minute Workout for Beginners at Home: 30-Day PlanThe AuraFit team researches and reviews home fitness gear and workout programs for real people with busy lives — no fluff, no fake credentials. We analyze the research and test what actually works. Find our recommended gear at Aura Heaven.
You Might Also Like

Coach Alex Turner
NASM-Certified Personal Trainer
Coach Alex lost 34 lbs with a $30 ab roller and has spent 8 years helping 200+ people train at home. Every guide on AuraFitGuides comes from real training experience, not theory.
Also from our team