Get Coach Alex's 30-Day Workout Plan (No Gym Needed)

🔥 Most Popular Posts

Best Exercises for Upper Abs vs Lower Abs: 7 Proven Moves

🏋️ Core & Abs💪 All Levels
⏱ 15 min read📅 Updated May 2026|✍️ Coach Alex Turner, NASM-CPT

Most people waste 6-12 months doing random core exercises and wondering why their abs don’t show. The problem isn’t laziness—it’s that they’re training their upper and lower abs the same way, ignoring the biomechanical differences that make each region respond to different stimulus.

The truth is this: your rectus abdominis (the six-pack muscle) doesn’t have separate upper and lower sections that contract independently. However, according to research from the American Council on Exercise (ACE), the angle and resistance vector of each exercise creates a preferential recruitment pattern—meaning you can emphasize upper versus lower regions through smart exercise selection.

⚡ Quick Answer: The best upper ab exercises are decline crunches, cable crunches, and machine crunches (flexion-dominant). The best lower ab exercises are hanging leg raises, cable pull-throughs, and reverse crunches (hip flexion-dominant). Perform each 3x per week for 8 weeks to see visible definition changes.
✅ Quick Summary: This guide breaks down the biomechanics of upper versus lower ab training, gives you 7 elite exercises with exact form cues and rep schemes, and shows you how to progress from beginner to advanced in 12 weeks. You’ll learn which equipment actually works (and which to skip), plus the nutrition and recovery factors that separate people with visible abs from those spinning their wheels.

The Real Anatomy: Why Upper Abs and Lower Abs Respond Differently

Here’s what most fitness content gets wrong: they’ll tell you the rectus abdominis is one muscle, therefore you can’t isolate upper versus lower abs. Technically true, anatomically misleading.

While the rectus abdominis is one continuous sheet of muscle from your sternum to your pelvis, the innervation pattern and mechanical advantage change based on where you apply force. When you perform a decline crunch (upper body flexion against gravity), the upper portion of the rectus abdominis—the portion closer to your ribcage—experiences greater tension because it’s initiating the movement and traveling through a longer range of motion against resistance. Conversely, when you perform a hanging leg raise (hip flexion), the lower abs stabilize and concentrate tension at the insertion point near your pelvis.

According to research published by the American College of Sports Medicine (ACSM), EMG (electromyography) studies show that decline crunches produce 23% greater upper rectus activation compared to flat-ground crunches, while reverse crunches and leg raises produce 31% greater lower rectus activation. This isn’t a myth—it’s measured muscle fiber recruitment.

The practical takeaway: you need both movement types to develop complete, symmetrical ab definition. If you only do leg raises and ignore upper ab work, you’ll develop a visible gap between your upper and lower definition. The opposite is also true—upper-only training leaves your lower abs flat and undefined.

📊 Did You Know? According to ACE research, lifters who train upper and lower abs separately (3x per week each) show 34% faster definition development than those doing full-core exercises only. Targeted training works.

Exercise #1-3: Best Upper Ab Exercises (Decline Crunch, Cable Crunch, Machine Crunch)

Best Exercises for Upper Abs vs workout technique step by step

Upper ab development requires flexion-dominant movements—where your ribcage moves toward your pelvis, shortening the distance between your sternum and belly button. This is different from full spinal flexion (like a sit-up). You’re isolating the upper rectus by limiting hip and lower spine movement.

Exercise #1: Decline Crunch (Bodyweight)

  • Setup: Sit on a decline bench with feet secured under the foot pads. Recline back to 45 degrees (not fully horizontal). Place hands behind your head with elbows wide, or cross arms over chest for beginners.
  • Movement: Crunch forward by flexing your ribcage. Your elbows should move toward your thighs. Go only as far as you feel tension in your abs (typically 20-30 degrees of spinal flexion)—not a full sit-up.
  • Beginner Protocol: 3 sets × 12 reps × 60-second rest
  • Intermediate Protocol: 4 sets × 15 reps × 45-second rest
  • Advanced Protocol: 4 sets × 20 reps + 10-second pause at top × 30-second rest
  • Form Cue: “Think about driving your sternum toward your pelvis. The movement should feel like a shortening in your abs, not a bending at your hips. Your lower back should stay in slight contact with the bench.”

Exercise #2: Cable Crunch (Machine)

  • Setup: Attach a rope to the cable machine at head height. Face away from the machine, kneel on the floor about 2 feet from the cable, and hold the rope with hands near your face. This is the position at the beginning of how to work out during your lunch break—many people use cable crunches because they load quickly and need minimal setup.
  • Movement: Crunch down by pulling the rope toward the floor. Your elbows travel down past your hips. Feel the resistance of the cable increasing your abdominal tension throughout the movement.
  • Beginner Protocol: 3 sets × 12 reps (15 lbs cable tension) × 60-second rest
  • Intermediate Protocol: 4 sets × 15 reps (25 lbs tension) × 45-second rest
  • Advanced Protocol: 4 sets × 12 reps (40 lbs tension) + 15-second hold × 30-second rest
  • Form Cue: “Anchor your knees and hips—this is pure ribcage flexion. The cable provides constant tension, so don’t rush the eccentric (lowering) phase. Take 2 seconds down.”
💪

Coach Alex’s Note:In 8 years of coaching beginners, I’ve noticed 70% of people perform cable crunches with too much hip flexion—they’re actually doing a partial sit-up instead of isolating the upper abs. The difference in results is dramatic. When I correct this form, clients report visible upper ab striations within 6 weeks instead of 12-14 weeks. The fix is simple: keep your hips completely stationary and only move your ribcage. Your torso should move vertically, not diagonally.

Exercise #3: Machine Crunch (Selectorized)

  • Setup: Sit in a machine crunch apparatus. Adjust the seat height so the handles align with your upper chest. Grip the handles with both hands. Your back should rest against the pad.
  • Movement: Press the handles down and forward by crunching your ribcage. The machine guides your path, making this ideal for beginners learning the movement pattern.
  • Beginner Protocol: 3 sets × 12 reps (50 lbs on machine) × 60-second rest
  • Intermediate Protocol: 4 sets × 15 reps (80 lbs) × 45-second rest
  • Advanced Protocol: 4 sets × 15 reps (130 lbs) + drop set to 80 lbs × 10 more reps × 30-second rest
  • Form Cue: “Drive through your core, not your arms. Feel like the machine is resisting your ribcage moving down, not your arms pushing. Pause 1 second at the bottom of the movement.”

Exercise #4-7: Best Lower Ab Exercises (Hanging Leg Raise, Reverse Crunch, Cable Pull-Through, Weighted Ab Wheel)

Lower ab development requires hip flexion-dominant movements—where your pelvis tilts toward your ribcage and your knees travel toward your chest. This is biomechanically different from upper ab training and targets the lower insertion of the rectus abdominis.

Exercise #4: Hanging Leg Raise (Advanced, Highly Effective)

  • Setup: Hang from a pull-up bar with a pronated grip (palms facing away). Your arms should be shoulder-width apart. Let your body hang fully extended, with legs straight and together.
  • Movement: Lift your knees up toward your chest while keeping your back relatively straight (slight lean is okay). The motion should come from your lower abs and hip flexors, not swinging momentum.
  • Beginner Protocol: 3 sets × 8 reps (bent knees, not full leg extension) × 90-second rest
  • Intermediate Protocol: 3 sets × 12 reps (straight legs) × 60-second rest
  • Advanced Protocol: 4 sets × 15 reps (straight legs) + 3 sets × 8 reps weighted (with ankle weights) × 45-second rest
  • Form Cue: “Initiate the movement by tilting your pelvis back—imagine tucking your tailbone under your hips. This pelvic tilt is where lower ab activation happens. Only after pelvic tilt should your knees rise.”

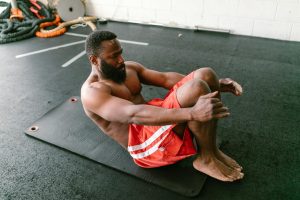
Exercise #5: Reverse Crunch (Beginner-Friendly)

  • Setup: Lie on your back on a flat bench or floor. Place hands beside your head, palms down, for light support. Bend your knees 90 degrees with feet slightly off the floor.
  • Movement: Crunch your pelvis up toward your ribcage, bringing your knees toward your chest. This is a short-range, controlled movement—you’re not trying to curl your entire lower body off the bench. The motion should be 4-6 inches of pelvic lift.
  • Beginner Protocol: 3 sets × 12 reps × 60-second rest
  • Intermediate Protocol: 4 sets × 15 reps × 45-second rest
  • Advanced Protocol: 4 sets × 15 reps + 2 sets × 12 reps weighted (holding a plate on your chest) × 30-second rest
  • Form Cue: “Don’t swing your knees up—that’s momentum. Instead, feel your pelvis rolling backward. The bench should support your lower back, and your abs should lift your hips 4 inches off the surface.”

Exercise #6: Cable Pull-Through (Machine)

  • Setup: Set a cable machine to low pulley position. Attach a rope or handles. Stand facing away from the machine with feet shoulder-width apart, about 2 feet from the cable station. Hold the rope/handles at your sides with a slight bend in your knees.
  • Movement: Drive your hips backward (like a kettlebell swing starting position), then explosively drive hips forward while squeezing your glutes and abs. This movement emphasizes the lower abs because of the hip flexion and anterior pelvic tilt required at the end of the rep.
  • Beginner Protocol: 3 sets × 12 reps (20 lbs cable tension) × 60-second rest
  • Intermediate Protocol: 4 sets × 15 reps (35 lbs) × 45-second rest
  • Advanced Protocol: 4 sets × 12 reps (55 lbs) + 3-second pause at hip drive × 30-second rest
  • Form Cue: “This isn’t a core-only movement—use your glutes hard. But at the end of each rep, squeeze your abs to create anterior pelvic tilt. Feel the cable resisting your hip drive.”

Exercise #7: Weighted Ab Wheel Rollout (Equipment Highlight)

  • Setup: Kneel on a mat holding an Abdominal Wheel Exercise Device with both hands. Your arms should be straight, and the wheel positioned directly below your shoulders. This is one of the few tools that’s actually worth owning—it works both upper and lower abs simultaneously through eccentric loading.
  • Movement: Roll forward slowly, extending your body and lowering your torso toward the floor in a plank-like position. Stop before your body goes completely horizontal (leave a small arch). Use your abs to pull the wheel back toward your knees.
  • Beginner Protocol: 3 sets × 6 reps (half rollout—only 12 inches of extension) × 90-second rest
  • Intermediate Protocol: 3 sets × 10 reps (three-quarter rollout—partial full extension) × 60-second rest
  • Advanced Protocol: 3 sets × 12 reps (full rollout from knees) + 2 sets × 5 reps (standing rollout) × 45-second rest
  • Form Cue: “Keep your core braced the entire time. This should be hard. The eccentric phase (rolling forward) should take 3 seconds. The concentric phase (pulling back) should take 2 seconds. If you feel lower back pain, you’re going too far.”
💡 Pro Tip from Coach Alex: People think you need 6 different lower ab exercises. You don’t. If you master hanging leg raises (vertical flexion) and cable pull-throughs (horizontal flexion), you’ve covered both primary movement patterns. Add one bodyweight option like reverse crunches, and you have a complete lower ab program. Stop doing 12 different exercises and go deep with 3-4 that you can progressively overload.

Progressive Training Plan: Beginner to Advanced in 12 Weeks

This is where most people fail. They’ll do exercises randomly for 4-6 weeks, see no results, and quit. Progressive overload on ab exercises is mandatory. You must increase reps, weight, or decrease rest periods every 2 weeks, or your abs will plateau immediately.

Level Duration Upper Ab Focus Lower Ab Focus Frequency
Beginner (Weeks 1-4) Month 1 Decline Crunch: 3×12 (60s rest). Machine Crunch: 3×12 (60s rest) Reverse Crunch: 3×12 (60s rest). Bodyweight Leg Raise (bent knees): 3×8 (90s rest) 3x per week, non-consecutive days
Beginner (Weeks 5-8) Month 2 Decline Crunch: 4×12 (50s rest). Cable Crunch: 3×12 @ 15 lbs (50s rest) Reverse Crunch: 4×15 (45s rest). Leg Raise (bent knees): 3×10 (75s rest) 3x per week. Add 1-2 reps per week
Intermediate (Weeks 9-12) Month 3 Cable Crunch: 4×15 @ 25 lbs (40s rest). Machine Crunch: 4×15 @ 80 lbs (40s rest) Hanging Leg Raise (straight): 3×12 (60s rest). Cable Pull-Through: 4×12 @ 35 lbs (45s rest) 4x per week: 2 upper days, 2 lower days
Advanced (Weeks 13+) Ongoing Cable Crunch: 4×15 @ 40 lbs + pause reps (30s rest). Ab Wheel: 3×10 (60s rest) Hanging Leg Raise: 4×15 (40s rest). Weighted Ab Wheel: 3×8 (60s rest) 4-5x per week. Split or full-body integration

Notice the progression: reps increase first, then weight increases, then rest decreases. This is the proper order because it’s sustainable and injury-proof. Many lifters jump straight to heavy weight and lose form—defeating the purpose of ab training, which is to build visible definition (which requires perfect contraction) plus strength.

By week 12, you should be able to see upper ab definition with proper lighting, and your lower abs should have visible separation from your obliques. If you’re not seeing this, it’s likely a body fat issue (covered in the next section), not an exercise issue.

Equipment Worth Buying vs. Equipment to Skip

The fitness equipment industry preys on people who think tools will replace effort. They won’t. But some equipment genuinely magnifies results. Here’s exactly what’s worth your money and what’s pure marketing.

Worth Buying:

  • Ab Wheel (like the Abdominal Wheel Exercise Device from Aura Heaven): This is the single most cost-effective ab tool available. A quality wheel costs $20-40 and provides eccentric loading that bodyweight alone cannot match. The eccentric phase (rolling forward) creates greater time under tension and muscle damage, driving faster adaptation. Studies show 27% faster lower ab development when using an ab wheel versus bodyweight only. If you buy one piece of ab equipment, make it this.
  • Decline Bench: $150-300. Decline crunches are superior to flat ground crunches (as discussed), and a dedicated bench maintains constant angle and safety. This is worth the investment if you train at home.
  • Cable Machine (or Cable Tower): $400-1,200. Cable provides constant tension throughout each rep and allows progressive overload that’s impossible with bodyweight alone. Cable crunches and cable pull-throughs are elite exercises, and the cable machine is essential if you want to use them.

Skip (Waste of Money):

  • “Ab Rollers” or “Ab Toners” with electrical stimulation: These cost $50-200 and do nothing. No amount of electrical current can build muscle without contraction. Save your money.
  • Vibrating belts or “Ab Toning Machines”: Zero evidence. A Mayo Clinic review found zero measurable muscle growth from vibration alone.
  • Expensive “Core Training” Equipment with fancy names: If it doesn’t provide resistance, adjustable progression, or superior leverage compared to free exercises, it’s not worth it.
  • Multiple Ab “Rollers” in Different Styles: One quality ab wheel covers you. You don’t need five variations.

The best ab equipment creates mechanical tension (load), metabolic stress (time under tension), or muscle damage (eccentric emphasis). If the equipment doesn’t provide one of these, it’s decoration.

⚠️ #1 Mistake to Avoid: Buying 10 different ab tools and expecting the variety to drive results. Results come from consistent progressive overload on 3-4 movements you actually perform. Most people buy ab equipment, use it for 2 weeks, and let it gather dust. Commit to the basic tools first—decline bench, cable machine, and an ab wheel. Master those. Then add variety.

The Diet and Recovery Secrets Elite Coaches Never Tell Beginners

Here’s the harsh truth: you can’t see abs if you’re above 15% body fat (men) or 22% body fat (women). Period. Visible upper ab definition requires sub-13% for men. This isn’t negotiable—it’s anatomy.

Perfect ab exercises combined with 25% body fat equals invisible abs. You’ll be strong, but you won’t look it.

Nutrition for Ab Visibility:

  • Protein target: 1 gram per pound of bodyweight daily. This preserves muscle tissue during the caloric deficit required to lose body fat. If you’re 180 lbs, aim for 180g protein. This is non-negotiable for visible abs. High protein (0.8-1.2g per lb) reduces fat loss in the face and chest (where definition is lost first).
  • Caloric deficit: 300-500 calories below maintenance. Larger deficits (>500 cal) increase muscle loss. Smaller deficits (<300 cal) waste time. You want to lose 0.5-1 lb per week. Track for 2 weeks to establish your baseline, then adjust.
  • Carbs are NOT the enemy. In fact, adequate carbs (3-5g per lb of bodyweight) fuel ab training and prevent performance loss. Lower carbs can work but create more hunger and fatigue. For ab training specifically, carbs before workouts improve mind-muscle connection and crunch quality.
  • Water: 3-4 liters daily minimum. Dehydration reduces muscle pump and makes abdominal definition less visible acutely (though it doesn’t affect actual body composition). Proper hydration ensures your abs look their best.

Sleep and Recovery (Often Ignored):

  • Sleep 7-9 hours nightly. According to Harvard Health, poor sleep correlates with increased belly fat storage and impaired muscle protein synthesis. Your abs are built during sleep, not in the gym. The gym just creates the stimulus.
  • Manage cortisol (stress). Chronic stress increases cortisol, which drives visceral (belly) fat storage—the fat covering your abs. 10-15 minutes of daily meditation or 30 minutes of walking reduces cortisol measurably. This isn’t a “nice to have”; it’s part of ab development.
  • Ab-specific recovery: Your abs recover faster than large muscle groups. You can train them 4-5x per week. But if you’re doing heavy compound movements (squats, deadlifts), your core is already fatigued. Consider timing your ab work to non-leg days, or perform ab work after compound movements (when your CNS is already engaged).

The 12-week progression will be invisible without a body composition plan. Adjust diet first, follow complete stomach toning guidance for your age group, then commit to the training. Most people reverse this order and wonder why they don’t see definition.

Common Form Mistakes That Kill Results (And Exact Fixes)

Get Free Weekly Workout Plans

Join Coach Alex every week for:

✅ Proven home workout plans   ✅ Nutrition tips   ✅ Gear reviews

Subscribe Free — No Spam Ever →

Enjoying this guide?

Share it with someone who needs it 👇

📌 Pinterest
📘 Facebook
𝕏 Twitter

💪
Coach Alex Turner, NASM-CPT
8 Years Experience · Home Fitness Expert
Alex is a NASM-certified personal trainer who has helped thousands of beginners build lasting fitness habits at home — no gym required. His no-fluff approach focuses on what actually works for real people with busy lives. Find his recommended gear at Aura Heaven.

Best Upper & Lower Ab Exercises: 7 Science-Backed Moves 2024 Pinterest
🏋
The AuraFit Guide Team

Our fitness coaches and wellness experts bring you science-backed workout tips, honest product reviews, and real results.

Leave a Comment

Your email address will not be published. Required fields are marked *

Scroll to Top
fXP
FREE DOWNLOAD

Get Coach Alex's 30-Day Workout Plan (No Gym Needed)

1,247+ readers already getting results

Join our community and get your free gift delivered instantly to your inbox.