If you’re over 60 and worried that back pain, poor balance, or weak core muscles are just part of aging, I have good news: they don’t have to be. A strong core isn’t just for gym enthusiasts—it’s the foundation for independent living, preventing falls, and enjoying activities you love without pain.
The challenge is that most core workouts you’ll find online are designed for people in their 20s and 30s. They ignore the specific needs, limitations, and concerns of seniors. That changes today.
- Why Seniors Need a Different Core Training Approach
- Exercise 1: Dead Bugs (The Safest Core Foundation)
- Exercise 2: Standing Marches (Build Stability Without Floor Work)
- Exercise 3: Wall Plank Holds (Modified Planks That Protect Your Back)
- Exercise 4: Bird Dogs (The Gold Standard for Fall Prevention)
- Exercise 5: Glute Bridges (Activate Your Core Without Spinal Stress)
- Exercise 6: Side-Lying Leg Lifts & Exercise 7: Standing Knee Lifts
- Your Complete 3-Day Core Routine for Seniors
- Frequently Asked Questions
Why Seniors Need a Different Core Training Approach
The traditional fitness industry treats a 65-year-old the same way it treats a 25-year-old. Crunches. Sit-ups. Planks on the floor. V-ups. This approach is not just ineffective for seniors—it’s dangerous.
According to the American Council on Exercise (ACE), the primary goal of core training for adults over 60 should be functional stability and fall prevention, not aesthetic abs. Your core isn’t just your abs—it’s your rectus abdominis, transverse abdominis, obliques, erector spinae, and glutes working together as a muscular corset that stabilizes your spine during everyday movement.
Here’s what changes with age: spinal discs lose water content, vertebrae become more brittle, balance proprioception declines, and your stabilizer muscles atrophy faster than large muscle groups. Traditional crunches compress your spine into a position that can irritate discs and aggravate arthritis. Floor-based exercises require mobility many seniors don’t have. And exercises that focus only on flexion (bending forward) ignore the postural demands of real life—where you need to resist rotation, maintain upright posture, and react to balance threats.
The 7 exercises in this guide are different. They’re based on ACSM (American College of Sports Medicine) recommendations for aging adults. They emphasize anti-rotation, anti-extension, and dynamic stability. They keep you upright or in neutral spine positions. They can be regressed if you’re recovering from injury or extremely deconditioned, and progressed if you’re already active. And they require nothing but your body, your home, and 15 minutes three times per week.
Exercise 1: Dead Bugs (The Safest Core Foundation)
Why Dead Bugs for Seniors? Dead bugs are the gold standard starter exercise for core training because they teach your deep stabilizer muscles (transverse abdominis) to engage while your spine stays in a safe, neutral position. There’s no spinal compression, no balance challenge, and no joint strain. You’re lying on your back—a position where your body is supported—learning the fundamental core movement pattern.
How to Perform Dead Bugs (Beginner):
- Lie flat on your back on a mat or carpeted floor with knees bent and feet flat on the floor, hip-width apart.
- Raise both arms straight up toward the ceiling, palms facing each other.
- Slowly raise your right knee toward your chest—about 90 degrees of hip flexion—while keeping your left foot planted on the floor.
- Lower your right leg and simultaneously raise your left knee. This is 1 repetition.
- Breathing: Exhale as you raise your leg; inhale as you lower it. Never hold your breath.
- Form Cue (CRITICAL): Your lower back should maintain contact with the floor the entire time. If your lower back arches or lifts, you’re moving your legs too high or too fast. Go slower. The moment your core “gives” and your back arches is your feedback signal to stop.
- Sets, Reps, Rest: 2 sets × 12 reps (6 per leg) × 90 seconds rest between sets.
Progression to Intermediate: Once 2×12 feels easy and you can maintain perfect form with your lower back flat, add the arm component. As your right knee lifts, simultaneously lower your right arm behind your head (keeping it straight). Return to start, then alternate sides. This creates a criss-cross pattern that challenges stability more. Perform 3 sets × 12 reps × 75 seconds rest.
Progression to Advanced: Straighten the lowering leg. Instead of bringing your knee toward your chest, extend your right leg long (hovering just 2 inches above the floor) while lowering your opposite arm. This dramatically increases core demand because your limbs are farther from your body’s center, creating more leverage. Perform 3 sets × 10 reps × 60 seconds rest.
Exercise 2: Standing Marches (Build Stability Without Floor Work)
Not all seniors are comfortable getting down on the floor, and not all have the mobility to do so safely. Standing marches eliminate that barrier while building core stability in a functional, upright position—exactly how your core works during daily life.
How to Perform Standing Marches (Beginner):
- Stand upright with feet hip-width apart. Find a wall, counter, or sturdy chair within arm’s reach for light balance support (fingertips only—not gripping).
- Engage your core by drawing your belly button gently toward your spine. Maintain upright posture; don’t lean forward.
- Slowly lift your right knee toward hip height (about 45–60 degrees), keeping your left leg straight and planted.
- Lower your right leg back to standing position, then lift your left knee. This is a controlled, deliberate march—not fast.
- Tempo: 1 second to lift, 1 second to lower. Slow and controlled.
- Breathing: Exhale as you lift your knee; inhale as you lower it.
- Form Cue (CRITICAL): Your torso should NOT rotate or lean. Your hips should not hike. Watch yourself in a mirror if possible. The movement should come only from your hip flexors lifting your knee, while your core stabilizes your spine.
- Sets, Reps, Rest: 3 sets × 15 marches per leg (30 total) × 60 seconds rest. Duration: about 45 seconds per set.
Progression to Intermediate: Remove the wall contact. Stand with arms at your sides or crossed over your chest. Maintain the same march pattern but now your core must work harder to maintain balance without external support. This shift is significant. Perform 3 sets × 20 marches per leg × 60 seconds rest.
Progression to Advanced: Lift your knee higher (waist height) and hold the top position for 1 second, actively squeezing your core, before lowering. Or march in place while performing upper body movements—small arm circles, reaching across your body. Perform 3 sets × 15 marches per leg (higher) × 45 seconds rest.
Standing marches are also an excellent warm-up before other exercises and a safe, effective way to activate your core if you’re doing “active recovery” on non-core days. You’ll find them woven into the complete routine later in this article, and they’re perfectly suited to the framework we discuss in How to Add Core Training to Your Workout: 9 Science-Backed Strategies 2025, which covers periodization and how to build core work into your weekly schedule.
Exercise 3: Wall Plank Holds (Modified Planks That Protect Your Back)
Traditional floor planks are brutal for seniors—they’re uncomfortable to get into, they place massive load on wrists and shoulders, and they compress the spine in a way that can aggravate lower back issues. Wall planks eliminate these problems while still training the exact same muscles: your rectus abdominis, transverse abdominis, and shoulder stabilizers.
How to Perform Wall Plank Holds (Beginner):
- Stand facing a wall, about 24–30 inches away (about an arm’s length).
- Place both palms flat against the wall at shoulder height and shoulder-width apart. Your fingers should point upward.
- Lean forward, shifting your weight into your hands. Your body should form a straight line from your head to your heels—a 45-degree angle from the wall.
- Engage your core by drawing your belly button toward your spine. Squeeze your glutes. Your body should feel rigid.
- Breathing: Take slow, steady breaths. Exhale as you lean in; maintain steady breathing during the hold. Never hold your breath.
- Form Cue (CRITICAL): Your lower back should not sag. If it does, step closer to the wall to reduce the angle. Your head should stay neutral—don’t look up or down. Imagine a straight line from your ears to your heels.
- Duration & Rest: Hold for 15–20 seconds, rest 45 seconds, repeat 4 times. Total: about 3–4 minutes including rest.
Progression to Intermediate: Step back slightly to increase the angle to approximately 35–40 degrees. Perform 4 sets × 25-second holds × 45 seconds rest.
Progression to Advanced: Increase the angle to 30 degrees (nearly horizontal) or perform the hold with one foot lifted slightly off the ground, shifting weight to the other leg. This creates instability that forces your core to work harder. Perform 4 sets × 20-second holds × 60 seconds rest (increased rest due to higher difficulty).
| Level | Distance from Wall | Duration per Hold | Sets | Rest |
|---|---|---|---|---|
| Beginner | 24–30 inches | 15–20 seconds | 4 | 45 sec |
| Intermediate | 18–24 inches | 25–30 seconds | 4 | 45 sec |
| Advanced | 12–18 inches | 30–45 seconds | 4 | 60 sec |
Why Wall Planks Work: Research from the NSCA (National Strength and Conditioning Association) shows that isometric core training (static holds) is equally effective as dynamic core training for building stability. Wall planks take 60% less stress off your joints compared to floor planks while activating the same muscles at similar intensity levels.
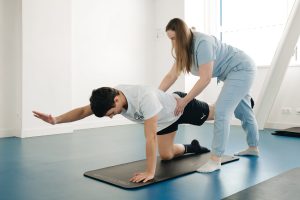
Exercise 4: Bird Dogs (The Gold Standard for Fall Prevention)
Bird dogs are often called the “gold standard” of core exercises for seniors because they simultaneously train core stability, hip strength, proprioception (balance awareness), and spinal health—all in one movement. They’re also incredibly versatile, scalable, and can be modified for almost any ability level.
How to Perform Bird Dogs (Beginner):
- Start on your hands and knees on a mat or carpet. Hands should be directly under your shoulders; knees directly under your hips.
- Engage your core and maintain a neutral spine (slight natural curve in your lower back, not sagging or hyperextended).
- Slowly extend your right arm straight forward to shoulder height and simultaneously extend your left leg straight back to hip height. Your body should form a straight line from your fingertips to your toes.
- Return to the starting position with control, then repeat on the opposite side (left arm, right leg).
- Breathing: Exhale as you extend; inhale as you return.
- Tempo: 2 seconds to extend, 1 second pause, 2 seconds to return. Slow and controlled.
- Form Cue (CRITICAL): Your pelvis should not rotate. If your right leg is extending back, your right hip should not hike upward. Use a mirror to watch, or ask a family member to observe. Any pelvic rotation means your core is not engaged enough—slow down or reduce range of motion.
- Sets, Reps, Rest: 2 sets × 10 reps per side (20 total) × 90 seconds rest.
Progression to Intermediate: Hold the extended position for 1–2 seconds, squeezing your core and glute. This isometric pause increases time under tension. Perform 3 sets × 12 reps per side × 75 seconds rest.
Progression to Advanced: Add a stability challenge by performing bird dogs on an unstable surface—like a pillow or foam pad under your knees. Or add a small pulse at full extension (tap your fingertips and toes gently 3 times before returning). Perform 3 sets × 15 reps per side × 60 seconds rest.
Exercise 5: Glute Bridges (Activate Your Core Without Spinal Stress)
Glute bridges are criminally underrated in core training, yet they’re one of the most functional exercises for seniors. They activate your entire posterior chain (glutes, hamstrings, lower back extensors) while your core works to maintain a stable spine during the movement. Unlike crunches or sit-ups, they don’t compress your spine—they decompress it.
How to Perform Glute Bridges (Beginner):
- Lie flat on your back on a mat with knees bent, feet flat on the floor, and heels about 12 inches from your glutes.
- Place your arms alongside your body, palms down, for light hand support (you’ll press into them gently).
- Press through your heels and squeeze your glutes, lifting your hips toward the ceiling. Your knees, hips, and shoulders should form a straight line at the top—like a bridge.
- Pause for 1 second at the top, then slowly lower your hips back to the starting position (hovering just above the floor, not resting).
- Breathing: Exhale as you drive upward; inhale as you lower.
- Form Cue (CRITICAL): Don’t hyperextend your lower back by driving your hips too high. Imagine a straight line from knees to hips to shoulders. Also, never allow your knees to cave inward—keep them tracking over your toes. If you feel this primarily in your lower back rather than your glutes, your core isn’t engaged. Reduce height or check your form.
- Sets, Reps, Rest: 2 sets × 12 reps × 90 seconds rest.
Progression to Intermediate: Add a 2–3 second pause at the top, actively squeezing your glutes and core. Perform 3 sets × 12 reps × 75 seconds rest.
Progression to Advanced: Perform single-leg glute bridges. Lie on your back, bend one knee with that foot planted, and extend the opposite leg straight up (knee slightly bent). Perform the bridge using only the planted leg. This dramatically increases glute and core activation. Perform 3 sets × 8 reps per leg × 90 seconds rest.
Why Glute Bridges Matter: Seniors often have weak glutes—a condition called “gluteal amnesia” that develops from sitting too much. Weak glutes force your lower back to stabilize your spine instead, leading to pain and dysfunction. Glute bridges reactivate these muscles, reducing lower back strain and improving hip stability during walking, stairs, and standing.
Exercise 6: Side-Lying Leg Lifts & Exercise 7: Standing Knee Lifts
These final two exercises target your obliques and hip abductors—muscles critical for rotational stability, lateral balance, and fall prevention. Most senior core routines neglect these muscles, focusing only on forward and backward movement. That’s a mistake.
Exercise 6: Side-Lying Leg Lifts (Beginner):
- Lie on your right side with your right leg extended and your left leg bent, foot planted on the floor in front for stability.
- Your right arm can be extended overhead or bent with hand supporting your head—whichever is more comfortable.
- Slowly lift your bottom (right) leg 12–18 inches off the floor, keeping it straight. Hold for 1 second, then lower with control.
- Form Cue (CRITICAL): Don’t roll backward. Your body should stay in the side-lying position; only your leg moves. If you’re rolling onto your back, you’re losing the oblique engagement.
- Sets, Reps, Rest: 2 sets × 12 reps per side × 90 seconds rest.
Progression (Intermediate): Add a 2-second pause at the top or perform small pulses (3 small lifts) at the top of the range before lowering. Perform 3 sets × 15 reps per side × 75 seconds rest.
Progression (Advanced): Perform the lifts with the top leg bent (creating a clamshell-like pattern) or add ankle weights if available. Perform 3 sets × 15 reps per side × 60 seconds rest.
Exercise 7: Standing Knee Lifts (Beginner):
- Stand upright with feet hip-width apart, light fingertip contact on a wall or counter if needed for balance.
- Slowly lift your right knee toward your chest (about 90-degree hip flexion) while maintaining upright posture. Hold for 1 second, then lower with control.
- Alternate legs. This is similar to standing marches but with a hold at the top.
- Form Cue (CRITICAL): Don’t lean back or forward. Your torso stays vertical throughout. Only your hip and knee move.
- Sets, Reps, Rest: 3 sets × 12 reps per leg × 60 seconds rest.
Progression (Intermediate): Remove wall contact. Perform the lifts without external support, standing freely. Perform 3 sets × 15 reps per leg × 60 seconds rest.
Progression (Advanced): Hold the elevated knee position for 2–3 seconds while simultaneously reaching your opposite arm toward the lifted knee, engaging your obliques. Perform 3 sets × 10 reps per side × 60 seconds rest.
Your Complete 3-Day Core Routine for Seniors (No Equipment)
Now that you understand each exercise, here’s how to combine them into an effective, safe, progressive routine. This is based on ACSM guidelines for older adults, which recommend core training 2–3 days per week with at least one rest day between sessions.
The 15-Minute Beginner Routine (Weeks 1–4):
- Warm-up (2 minutes): Standing marches, 30 seconds × 2 sets
- Main Work (10 minutes): Dead bugs (2 sets × 12 reps, 90 sec rest) → Standing marches (3 sets × 15 reps, 60 sec rest) → Wall planks (4 sets × 15-20 sec holds, 45 sec rest) → Bird dogs (2 sets × 10 reps/side, 90 sec rest)
- Cool-down (3 minutes): Gentle static stretching. Quad stretch, hamstring stretch, torso rotation stretch. Hold each 30 seconds, 2 per side.
- Frequency: Perform this routine 3 days per week (e.g., Monday, Wednesday, Friday) with at least 1 day rest between sessions.
The 18-Minute Intermediate Routine (Weeks 5–8):
- Warm-up (2 minutes): Standing marches without wall support, 45 seconds × 2 sets
- Main Work (13 minutes): Dead bugs (3 sets × 12 reps, 75 sec rest) → Bird dogs with hold (3 sets × 12 reps/side, 75 sec rest) → Wall planks (4 sets × 25-30 sec holds, 45 sec rest) → Glute bridges with pause (3 sets × 12 reps, 75 sec rest) → Side-lying leg lifts (2 sets × 15 reps/side, 75 sec rest)
- Cool-down (3 minutes): Same as beginner.
- Frequency: 3 days per week, same schedule. After week 8, assess your progress and decide whether to advance to the next level or repeat this routine for another cycle.
The 20-Minute Advanced Routine (Weeks 9+):
- Warm-up (2 minutes): Standing marches with knee lifts, 45 seconds × 2 sets
- Main Work (15 minutes): Dead bugs with straight legs (3 sets × 10 reps, 60 sec rest) → Bird dogs on unstable surface or with pulses (3 sets × 15 reps/side, 60 sec rest) → Wall planks at steeper angle (4 sets × 30-45 sec holds, 60 sec
📚 Keep Reading
→How to Stay Fit While Traveling: 7 Science-Backed Strategies 2025→How to Add Core Training to Your Workout: 9 Science-Backed Strategies 2025→How to Build a Home Gym on a Budget Under $500: 2025 Guide💪Coach Alex Turner, NASM-CPT 8 Years Experience · Home Fitness Expert
Alex is a NASM-certified personal trainer who has helped thousands of beginners build lasting fitness habits at home — no gym required. His no-fluff approach focuses on what actually works for real people with busy lives. Find his recommended gear at Aura Heaven.