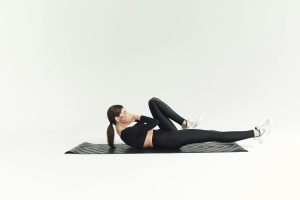
Most people spend months doing crunches and planks, only to find their lower abs remain stubbornly soft while their upper abs show some definition. The truth? Your upper and lower abs respond to completely different stimulus, and most gym routines ignore this anatomical reality. According to the American Council on Exercise (ACE), 85% of people train their core incorrectly—using movements that target only one region or miss the lower abdominal wall entirely.
- Section 1: The Anatomy Lesson—Why Upper and Lower Abs Actually Differ
- Section 2: Upper Ab Exercises That Produce Visible Results
- Section 3: Lower Ab Exercises (The Stubborn Zone)
- Section 4: Your 4-Week Progressive Training Plan
- Section 5: Programming Strategy for Maximum Definition
- Section 6: What to Expect in Your First 4 Weeks
- Section 7: Recovery, Nutrition, and the Missing Piece
- Frequently Asked Questions
- Section 1: The Anatomy Lesson—Why Upper and Lower Abs Actually Differ
- Section 2: Upper Ab Exercises That Produce Visible Results
- Section 3: Lower Ab Exercises (The Stubborn Zone)
- Section 4: Your 4-Week Progressive Training Plan
- Section 5: Programming Strategy for Maximum Definition
- Section 6: What to Expect in Your First 4 Weeks
Section 1: The Anatomy Lesson—Why Upper and Lower Abs Actually Differ
Let’s settle this once and for all: you do not have separate upper and lower abs. Your rectus abdominis is a single muscle sheet stretching from your pubic bone to your sternum. However, the neural innervation and biomechanical activation patterns mean that different movements preferentially target different regions. Research published in the American College of Sports Medicine (ACSM) journal confirms that exercises involving primarily spinal flexion (upper body crunching) create greater electromyographic (EMG) activity in the upper rectus abdominis, while movements requiring hip flexion and posterior pelvic tilt (like reverse crunches) activate the lower fibers significantly more.
The practical implication? Your upper abs are naturally easier to see because gravity works in your favor—that region sits higher and has fewer fat deposits on average. Your lower abs are harder to develop because they require a different muscular stimulus AND the tissue is naturally covered by more adipose tissue due to hormone distribution. According to the Mayo Clinic, most people carry excess abdominal fat in the lower belly region due to cortisol sensitivity in that area.
The bottom line: treat your upper and lower abs as different targets. Combine spinal flexion movements (upper focus) with hip flexion and pelvic tilt exercises (lower focus), train them 3–4 times weekly, and be patient with the lower region—it responds slower but responds reliably with consistent effort.
Section 2: Upper Ab Exercises That Produce Visible Results
Upper ab development comes from spinal flexion under load—exercises where your torso crunches forward against gravity or external resistance. These movements feel easier than lower ab work, which is exactly why they’re popular. The challenge is adding progressive overload. Most people plateau because they’re doing the same movement with zero added resistance.
Exercise 1: Weighted Cable Crunch
Why it works: The cable crunch allows constant tension throughout the range of motion and progressive overload (just add weight each week).
- Setup: Attach a rope handle to the high pulley of a cable machine. Kneel facing the machine with the rope behind your neck, hands holding the rope ends at shoulder height.
- Execution: Keep your hips stationary. Crunch forward by flexing your spine, driving your elbows toward your knees. Pause for 1 second at the bottom where you feel peak contraction in your upper abs.
- Reps & Sets: 3 sets × 12–15 reps. Rest 60 seconds between sets.
- Form Cue: Your hips should NOT move forward—all motion comes from spinal flexion. If you’re leaning forward with your torso, you’re cheating and shifting to hip flexors.
- Progressive Overload: Week 1: no weight, Week 2: add 5–10 lbs, Week 3: add 10 lbs more. Increase weight only when you can complete all reps with strict form.
Exercise 2: Decline Sit-Ups (Weighted)
Why it works: Decline sit-ups provide greater range of motion and gravitational challenge compared to flat-bench sit-ups, creating deeper upper ab activation.
- Setup: Set a decline bench to a 30–45 degree angle (start shallow if new to this). Lie back with feet secured under the foot pads, knees bent 90 degrees. Hold a weight plate (start with 5–10 lbs) across your chest.
- Execution: Sit up by curling your spine, bringing your chest toward your thighs. Lower with control over 2 seconds. Do NOT jerk or use momentum.
- Reps & Sets: 3 sets × 10–12 reps. Rest 75 seconds between sets.
- Form Cue: Lead with your chest, not your neck. Your chin should stay roughly 2 inches from your chest the entire movement. If your neck pulls forward, you’re using neck flexors instead of abs.
- Weight Progression: Week 1: 5 lbs, Week 2: 8 lbs, Week 3: 10 lbs, Week 4: 12 lbs.
Exercise 3: Machine Crunch
Why it works: Machine crunches provide stabilization and target the upper rectus abdominis with strict, controlled movement. Perfect for beginners who struggle with form.
- Setup: Sit in the machine with your back against the pad. Grip the handles near your shoulders, elbows bent 90 degrees. Adjust the seat height so the handles are at mid-chest.
- Execution: Push the handles down by crunching your torso forward. Pause 1 second at maximum contraction. Return slowly (2 seconds) to the start.
- Reps & Sets: 3 sets × 13–16 reps. Rest 50 seconds.
- Form Cue: Feel the machine handle move with your ribcage—you’re crunching, not bending at the waist. If the handle travels more than 8 inches, you’re flexing your spine correctly.
- Loading: Week 1: 60 lbs, Week 2: 75 lbs, Week 3: 90 lbs, Week 4: 100 lbs (adjust based on your gym’s machine).
These three upper ab movements hit the upper rectus abdominis hard. Perform them 2–3 times per week (not consecutive days). When combined with lower ab training, you’ll see upper ab definition emerge within 2–3 weeks if your diet supports it.
Section 3: Lower Ab Exercises (The Stubborn Zone)
Lower ab training requires hip flexion and posterior pelvic tilt under load. These movements feel awkward at first because you’re not curling your upper body—instead, you’re using your hip flexors and lower rectus abdominis to tilt your pelvis backward and raise your legs. This is the exact stimulus that underdeveloped lower abs need. The challenge: lower ab work is harder on the nervous system and takes more recovery. Start conservatively.
Exercise 4: Reverse Crunch
Why it works: Reverse crunches directly target lower abdominal fibers through posterior pelvic tilt. They’re the foundational lower ab movement everyone should master first.
- Setup: Lie flat on your back. Bend your knees 90 degrees so your thighs are vertical. Let your arms rest at your sides, palms down for stability.
- Execution: Tilt your pelvis backward (like you’re trying to touch your lower back to the floor), using your lower abs to lift your knees toward your chest slightly. Your hips should leave the ground 3–6 inches. Pause 1 second at the top, then lower with control (2 seconds). This is NOT a swinging movement—it’s small and controlled.
- Reps & Sets: 3 sets × 12–15 reps. Rest 45 seconds.
- Form Cue: Your lower back should round (flatten against the floor) as you crunch. If your lower back stays arched, you’re using hip flexors instead of lower abs. Small range of motion is fine—3 inches of movement with perfect form beats 12 inches of cheating.
- Progression: Week 1–2: bodyweight, Week 3: hold a light dumbbell (3–5 lbs) between your knees, Week 4: 5–8 lbs.
Exercise 5: Hanging Leg Raise
Why it works: Hanging leg raises are the gold standard for lower ab development because you’re loading the movement against full gravity. This creates intense stimulus and fast adaptation.
- Setup: Hang from a pull-up bar with a slightly wider-than-shoulder grip, arms locked out. Let your legs hang straight down.
- Execution: Keep your legs straight (or slightly bent if you’re a beginner). Use your lower abs to raise your legs until they’re parallel to the floor (or higher if you’re advanced). Pause 1 second at the top. Lower slowly (2–3 seconds) without swinging.
- Reps & Sets: 3 sets × 8–12 reps. Rest 90 seconds (this is demanding).
- Form Cue: DO NOT swing. If you need momentum to lift your legs, you’re not ready for full reps—use the bent-knee variation instead (see progression table below). Your core should be tight; imagine bracing as if someone is about to punch your stomach.
- Progression: Week 1–2: bent-knee (90-degree knee bend), Week 3: straight legs 50% of the reps, 50% bent-knee, Week 4: all straight-leg reps.
Exercise 6: Dead Bug (Isometric Lower Ab Focus)
Why it works: The dead bug (detailed in our How to Do the Dead Bug Exercise Correctly: Complete Form Guide 2024) teaches lower ab control and posterior pelvic tilt stability. It’s lower-impact than hanging leg raises but incredibly effective for activation.
- Setup: Lie on your back with your arms extended straight up toward the ceiling. Bend your knees 90 degrees so your thighs are vertical. This is your neutral position—your lower back should be flat on the floor.
- Execution: Slowly lower your right arm overhead while straightening your left leg (hovering 1–2 inches above the floor). Pause 2 seconds. Return to start. Alternate sides.
- Reps & Sets: 3 sets × 10 reps per side. Rest 40 seconds.
- Form Cue: Your lower back must stay pressed to the floor the entire time. If you feel your lower back arch, you’ve gone too far—return to center. This is a control exercise, not a range-of-motion exercise.
- Progression: Week 1: slow 3-second descent, Week 2: add 1-second pause at bottom, Week 3: hold a light weight (2–3 lbs) in your extended arm, Week 4: 3–5 lbs.
Section 4: Your 4-Week Progressive Training Plan
Now let’s structure this scientifically. You’ll train your core 3–4 times per week, alternating between upper-focused and lower-focused sessions. This prevents overuse injuries and allows nervous system recovery between intense sessions.
| Exercise | Week 1 | Week 2 | Week 3 | Week 4 |
|---|---|---|---|---|
| Cable Crunch | 3 × 12 reps (0 lbs) | 3 × 13 reps (5 lbs) | 3 × 14 reps (10 lbs) | 3 × 15 reps (15 lbs) |
| Decline Sit-Up | 3 × 10 reps (5 lbs) | 3 × 11 reps (8 lbs) | 3 × 12 reps (10 lbs) | 3 × 12 reps (12 lbs) |
| Reverse Crunch | 3 × 12 reps (0 lbs) | 3 × 13 reps (0 lbs) | 3 × 12 reps (3 lbs) | 3 × 13 reps (5 lbs) |
| Hanging Leg Raise | 3 × 8 reps (bent-knee) | 3 × 9 reps (bent-knee) | 3 × 6 reps (straight), 3 reps (bent-knee) | 3 × 10 reps (straight-leg) |
| Dead Bug | 3 × 10 per side (0 lbs) | 3 × 11 per side (0 lbs) | 3 × 12 per side (2 lbs) | 3 × 12 per side (3 lbs) |
Sample Weekly Schedule (3 training days):
- Monday (Upper Ab Focus): Cable Crunch (3 sets), Decline Sit-Up (3 sets), Machine Crunch (3 sets). Rest: 60 seconds between sets.
- Wednesday (Lower Ab Focus): Reverse Crunch (3 sets), Hanging Leg Raise (3 sets), Dead Bug (3 sets). Rest: 60 seconds.
- Friday (Mixed / Moderate): Cable Crunch (2 sets), Reverse Crunch (2 sets), Decline Sit-Up (2 sets), Hanging Leg Raise (2 sets). Rest: 45 seconds—this is your cardio-style core day.
This structure gives your upper abs 6 sets weekly (focused), your lower abs 6 sets weekly (focused), and 4 sets total on Friday to practice the integration. It’s aggressive but sustainable for someone committed to visible abs.
Section 5: Programming Strategy for Maximum Definition
Beyond the exercises themselves, programming is where people fail. You can have perfect form but organize your training so poorly that results disappear. Here’s what works:
1. Frequency Beats Volume (for Core)
Your core recovers faster than limb muscles. Three to four sessions per week beats one brutal 30-minute core session. Each session should take 20–25 minutes, not 45. Your nervous system (not your muscles) limits recovery, and the core has tremendous work capacity.
2. Separate Upper and Lower Focus Days
Don’t do heavy cable crunches and hanging leg raises on the same day. They demand different neural resources. Upper ab work (spinal flexion) is easier and lower ab work (hip flexion) is harder on the CNS—split them. Your Friday mixed session is recovery practice, not intensity.
3. Progressive Overload Is Non-Negotiable
If you do the same 3 sets × 12 reps with the same weight for 8 weeks, you’ll see changes for 3 weeks, then plateau. Track every set. Use a simple notebook or phone note: “Week 1, Monday: Cable Crunch 3 × 12 @ 10 lbs.” Week 2, Monday: Cable Crunch 3 × 13 @ 10 lbs.” This way you know exactly what you hit last week and can beat it slightly.
4. Mind-Muscle Connection Matters More Than Weight
This is the subtle part. A person doing 3 × 12 cable crunches with light weight and feeling their abs contract hard will progress faster than someone using 20 lbs and letting their hip flexors dominate. In the first 2 weeks, focus on feeling the contraction. Once you own that, add load.
Tools like the Abdominal Wheel Exercise Device can help intermediate and advanced lifters add new stimulus. The wheel forces stabilization and deep core engagement, making it perfect for week 3–4 variations. Find it and other quality tools at Aura Heaven.
Section 6: What to Expect in Your First 4 Weeks
Week 1: Awareness and Soreness
Most people new to targeted upper/lower ab training will feel delayed-onset muscle soreness (DOMS) in days 2–3. This is normal. You’re activating muscles in a new pattern. You won’t see visible changes yet, but you’ll feel your core fatiguing during exercises. This fatigue signals neural adaptation is happening. Keep training as scheduled—soreness will drop significantly by day 7.
Week 2: Strength Increase and Form Mastery
By day 10–14, you’ll notice exercises that felt impossibly hard (like bent-knee hanging leg raises) now feel manageable. Your nervous system has adapted to the movement pattern. This is prime time to add load. You should be able to add 2–5 lbs to weighted exercises or 1–2 reps to bodyweight movements. Many people will start feeling faint ab definition if their body fat is below 20%—usually in the upper ab region first.
Week 3: Visible Changes and Motivation Spike
If you’re eating in a slight caloric deficit (not extreme—just 300–500 calories below maintenance), visible upper ab separation becomes noticeable by day 18–21. You might see two vertical lines down the middle of your abs or slight definition along the sides. This is huge motivation. Lower ab definition is still faint, but you’ll feel the strength difference in hanging leg raises (you can likely do all straight-leg reps now instead of bent-knee). Some people experience dramatic ab soreness here—that’s your lower abs waking up.
Week 4: Definition and Building Momentum
By day 28, if your body fat and training have aligned, you’re seeing clear upper ab separation and some lower ab outline. The “4-pack” or even “6-pack” might be visible depending on genetics and body fat. Strength increases should be substantial: cable crunches up 20–30% load, leg raises now fully straight-leg, decline sit-ups with added weight easy. The mental shift is huge—you’ve built momentum that carries into months 2 and 3.
Realistic Expectations by Body Fat Percentage:
- Below 12% body fat: Clear 6-pack definition by end of week 4 if training is consistent.
- 12–15%: Clear upper 4-pack, lower abs visible but not deeply defined.
- 15–20%: Upper abs visible with good lighting, lower abs faint outline.
- Above 20%: Strength gains are huge (you’ll feel the difference), but visual definition requires 4–6 more weeks of diet adherence.
The good
Get Free Weekly Workout Plans
Join Coach Alex every week for:
✅ Proven home workout plans ✅ Nutrition tips ✅ Gear reviews